Cook Like a Monger: Risotto

by Anna Glassman-Kaufman

We’re going back to the basics this week with a classic risotto recipe. Don’t let risotto intimidate you. It may be a bit of a labor intensive process, but it never disappoints. Master this basic recipe and get ready to customize with seasonal produce and herbs, new stocks/broths, and unique cheeses.

Serves 2-3

Ingredients:  

2 tablespoons extra virgin olive oil 

¼ cup shallot, minced

1-2 cloves garlic, minced  

1 cups carnaroli (or arborio) rice  

3 cups chicken stock  

½ cup white wine, we recommend chardonnay  

½ cup Parmigiano-Reggiano, freshly grated, plus extra for garnish 

1 tablespoon unsalted butter  

Salt and pepper to taste 


Method 

  1. Bring chicken stock to a simmer in a medium saucepan. 

  2. Meanwhile, in a large heavy bottomed pot, sauté shallot and garlic in olive oil on low/medium heat until soft, but not browned. Season with salt and pepper.  

  3. Add rice and stir with a wooden spoon, until the rice is evenly coated with olive oil. Continue to stir for one minute until the rice has a nutty aroma.  

  4. Add the white wine and stir constantly until it is all absorbed into the rice.  

  5. Add about ½ cup of simmering stock and stir until nearly all of the liquid is absorbed. Then, add another ½ cup of stock and stir. Continue this process until all the stock is added (15-20 min) and risotto is al dente, creamy, and a little bit soupy.  

  6. Turn off heat and stir in grated Parmigiano-Reggiano and butter.  

  7. Garnish with a drizzle of extra virgin olive oil, more grated Parmigiano-Reggiano, and freshly cracked black pepper. Serve immediately.  

Cook Like a Monger: Berry Ricotta Cake

by Anna Glassman-Kaufman

When I was 18, I took a weekend trip to Portland, Maine, where I was introduced to a bakery called Standard Baking Company. To me, the bakery was perfect. They sold breads and pastries in a simple storefront, somehow perfectly toeing the line between delicate and rustic. That visit, and many more during my four years living in Boston, sent me down a path, dedicating my career to world of food & beverage, which started in baking. And on that first visit, I picked up a copy of their cookbook which contained the recipe that inspired the one I’ve shared with you below: the Berry Ricotta Cake.

A few years later, I found myself volunteering on a goat farm in Italy, with more ricotta than we knew what to do with. Ricotta is a byproduct of cheesemaking; made from whey, so with every batch of cheese we made, we made a batch of ricotta too. I started making this cake for my farm hosts - filling it with strawberries from their garden, sour plums from the tree outside their house, anything I could get my hands on. We’d carry it up the mountains and after a hard day’s work shepherding & milking goats, it always hit the spot. It’s a dependable recipe, and truly versatile.

This berry ricotta cake is the perfect example of a simple recipe that lets the quality ingredients shine. Ricotta has a magical quality in cake, giving the cake a moist and almost custardy texture. Adding ricotta to your batter ensures that your cake won’t dry out, whether kept in the fridge or on the counter. And it lets the cake stand alone, with no need for frosting. This is truly a snacking cake, made to pair with coffee or tea.

This recipe is written for a standard loaf pan, but feel free to adapt it to your needs. I’ve made this as a loaf, a bundt (as in this picture), a round cake, cupcakes. As long as the batter only fills about ⅔ of the pan you’re using, you’re good to go. You can add whatever citrus, berries, or other fruit you have on hand. And I promise you, once you’ve baked a cake with ricotta, you won’t go back.

Ingredients:

  • 10 tbsp salted butter, softened  

  • 1 ¼ cup sugar  

  • 10 oz Calabro Whole Milk Ricotta  

  • 3 medium eggs  

  • 1 tbsp lemon zest  

  • 1 ½ tsp pure vanilla extract  

  • 1 ½ cups all-purpose flour  

  • 2 tsp baking powder 

  • ½ tsp salt  

  • 1 ½ cups fresh berries (whole if small or cut into about ½ inch pieces if large) 

 Method:

  1. Preheat oven to 350°F. 

  2. Line a 9x5 inch loaf pan with parchment paper, or grease and flour all sides.  

  3. Using a hand mixer or stand mixer with paddle attachment, cream butter and sugar until light and fluffy. Scrape bowl well.  

  4. Add ricotta and mix on low speed to combine.  

  5. Add one egg at a time, beating well and scraping between each addition. Then add lemon zest and vanilla extract.  

  6. Sift the dry ingredients together, and add in one addition, beating on a low speed until just combined.  

  7. Fold in berries by hand.  

  8. Pour into your loaf pan and bake for 55-60 minutes, rotating the pan halfway through the bake. The cake will be a rich brown color and a toothpick should come out clean from the center.  

  9. Let your cake cool completely, then turn out and slice to serve.  

Thai Beef Salad

 
Bowl of Thai beef salad, featuring fresh vegetables and herbs & beef.
 

by Austin Coe Butler

This recipe is inspired by a Thai dish called Yum Nua, which quickly became a favorite in our house. As it relies on produce that can be grown well even in greenhouses like cucumbers and cherry tomatoes, this Thai beef salad is always satisfying whether it’s been grilled over charcoal on a summer’s day or pan seared on a winter’s night. 

The dressing makes this recipe sing. It’s similar to a Vietnamese nuoc cham, a tangy, salty sauce of lime juice, sugar, and fish sauce, but it has the addition of cilantro stems, garlic, and chilis for an herbaceous heat. Unlike parsley or oregano, cilantro stems have almost as much flavor in them as the leaves, and when cut finely or crushed, they’re delightful to eat and not stringy at all. Don’t be afraid of the fish sauce! While this may seem like an unfamiliar ingredient, think of it as a southeast Asian worcestershire sauce. It has a deeply satisfying salty and umami quality that compliments and accentuates meat, vegetables, and, a personal favorite of mine, mushrooms. You can find the Red Boat brand fish sauce in many coops and high-end grocery stores, or a variety of brands at your nearest Asian grocery store. I prefer the Squid brand (it doesn’t contain squid, it’s just called that!)

For the beef, you can use whatever cut you like, but I prefer using longer, thinner cuts like skirt, bavette, flank, or flat iron, all of which we readily carry in the meat case. These cuts benefit from a quick sear and cutting against the grain. If you don’t eat beef, you could substitute pork chops or chicken thighs to great success.

For the salad: 

1 lb. beef cut of your choice, but preferably longer, thinner cuts like skirt, bavette, flank, or flat iron. 

1 small red onion, sliced thinly

1 English cucumber, deseeded and sliced thinly on a bias

1 pint of cherry tomatoes, halved

Mixed greens

¼ c. cilantro leaves

¼ c. mint leaves

Crushed peanuts to garnish

For the dressing:

1 tbsp cilantro stems

1 to 2 cloves garlic

3 tbsp fish sauce

3 tbsp lime juice

2 Thai bird’s eye chilis

1 tbsp neutral oil

2 tsp sugar

Salt to taste

Directions

  1. At least 30 minutes before you plan to cook the steak, pull it from the refrigerator to temper it and season generously with salt.

  2. Prepare the dressing. Add the cilantro stems, garlic, Thai chilis, sugar, and just a pinch of salt to a mortar and pestle and work them into a paste. You can also use a food processor. Next, add the fish sauce, lime juice, and oil and stir to combine. Taste for seasoning and adjust accordingly. It should be balanced between the tart acidity of the limes, the salty umami of the fish sauce, and the herbaceous heat of the aromatics.

  3. Prepare the base of your salad. Halve the cucumber and remove the seeds with a spoon, then cut half moons at an angle. If you want to take the edge off the raw red onion, you can place it in a bowl of ice water for a few minutes. I like to lightly salt the tomatoes to draw some of the juices out and add them to the salad dressing, contributing some of their sweetness. Combine all the vegetables including the mixed greens, cilantro leaves, and mint in a large bowl.

  4. Over high heat, grill or pan sear the beef to your desired doneness. For medium rare, that’s about 4 minutes each side. Allow the beef to rest for ten minutes.

  5. Once rested, cut the beef into strips against the grain. This may involve first cutting the beef along the grain into shorter sections and then cutting against the grain. I like to cut the beef at a 45º for wide strips.

  6. Dress the salad to your liking, reserving a few spoonfuls of the dressing. You can either add the beef directly to the salad when you toss it, or you can serve it on top of the tossed salad.

  7. Garnish with more cilantro and mint leaves, the crushed peanuts, and a final, generous spoonful or two of the reserve dressing over the beef. This salad is great warm, room temperature, or cold, so serve it however you’d like!

Cook Like a Monger: The Bánh Mì Burger

by Matt Gruber

Alright, let's talk bánh mì: a Vietnamese staple which dates back to the 1950's; a phenomenal sandwich on a short baguette, typically with some combination of pork, cilantro, cucumber, pickled carrots and daikon. You will see the French influence in certain variations as well, sometimes with a pâté or some form of mayonnaise.

It wasn't until after the Vietnam War that we began to see this sandwich more often in the US. Fast forward in time a bit and we start to see some new innovations in food happen. People start getting creative and combining food staples from around the world: one region’s cooking techniques with another’s cut of meat. Some of my favorite dishes are the culinary lovechild of two regions: gyro tacos, kimchi avocado toast, deep fried bok choy chaat. In 1988 the term "fusion cooking" was used in a speech given by Norman Van Aken (who has been called the Walt Whitman of American cuisine), coining the phrase we use today for such cuisine.

Here, I'm channeling one of the fusion godfathers, Wolfgang Puck, and transforming the bánh mì into a new summer staple... the bánh mì burger.

Ingredients:

1# Ground Pork (will make ~3 burgers)

Rose Street Bakery’s Japanese milk buns

Salt and Pepper to taste

1/4 cup cilantro, chopped

2-3 carrots, grated

1-2 baby cucumbers, sliced into coins

1 tsp ginger, minced

1 tsp garlic powder

1 1/2 tablespoon black garlic molasses

1/4 cup soy or ponzu sauce

1/2 red onion, sliced into moons

1 lime

1/4 cup white vinegar

 For the adventurous crowd, 1 jar of pork liver mousse

Directions:

In a bowl, combine juice of half lime, 1 tsp sugar, sliced onions, salt and pepper, 1/4 cup vinegar- set aside to quick pickle.

In a second bowl, mix your pork, garlic powder, ponzu/soy sauce, cilantro, black garlic molasses, then form into patties.

Preheat your cast iron or favorite heavy bottom pan on medium heat, place burgers in pan once preheated and cook for 4 1/2 - 5 minutes per side. Once cooked, pull off and let rest for 2-3 minutes, assemble burger with pickled veggies on top, garnish with cilantro if desired (and the pork liver mousse) and enjoy!

Cook like a Monger: Duck Confit Fried Rice

by Austin Coe Butler

Making fried rice is less about following a recipe and more about being in a state of mind. That is to say, it’s a great technique to have in your repertoire. In its ingredients and complexity, it can be dialed up or down from late night snack to date night main depending on the occasion or what’s in your fridge. You can use practically anything—carrots, frozen peas, corn, cabbage, rotisserie chicken, old steak, frozen shrimp—but to make it a meal I like to include two vegetables and a protein. For this recipe, I thought of a fabulous basil duck stir fry I had recently at Kahluna, and I had some pineapple laying around in the fridge. I added our house-made duck confit as an elegant yet easy and ready-cooked protein. 

Less is more when making fried rice. Too many ingredients, or too great a volume, and your fried rice will steam as opposed to pan fry and get that wok hei flavor, that inimitable subtle smoky, char that permeates a good restaurant-quality stir fry. In restaurants, chefs are using gas burners that resemble jet engines more than they do a kitchen stove, so the trick is to manage heat and volume. For that reason, I recommend cooking this dish in two batches. If you have an induction stove top or are using a flat bottomed skillet, you can still make an exceptional stir fry by following a few tricks.

First, make sure all your mise en place is done before you start. From start to finish, fried rice should take less than five minutes to cook. Cut small, uniform pieces of the ingredients so they cook quickly and evenly. Second, and most importantly, use day old rice. Using day old rice is the biggest upgrade to your fried rice home cooks can make. Day old rice is drier and separates into individual grains more readily than fresh rice. Fried rice made with fresh rice gets clumpy and soggy.

If you don’t have day old rice hiding in your fridge from your last delivery order, simply make some before you get started on the prep work. Be sure to rinse the rice before you cook it in a fine mesh strainer until the water runs clear, which removes extra starch that can make rice gummy. Cook it according to the instructions on the bag or your rice cooker if you have one. Once it’s done, spread the rice out onto a baking sheet to allow it to cool and dry. Just an hour or even only 30 minutes of drying rice like this will get you nice individual grains of rice that won’t clump together. Bonus points if you cook the rice in chicken stock with garlic and ginger for extra flavor.

For the basil in this recipe, I encourage you to use Genovese basil, the basil ubiquitous at supermarkets or coops, rather than seeking out Thai basil for this recipe. Often, the “basil” used in Thai stir fries is holy basil, which has a peppery quality far more similar to Genovese basil than the anise flavor in Thai basil. 

Ingredients:

1 package (about 1/2 lb.) France 44 duck confit, shredded

3 tablespoons France 44 Duck Fat or a neutral oil

2 cups day old or cold white rice

2 Locally Laid Eggs

1 medium shallot or 1/4 red onion, diced

3 cloves of garlic, minced

1/2 red bell pepper, diced

4 Thai chilis (optional), sliced

1/4 cup pineapple, diced

1/2 cup basil, small leaves left whole, large leaves torn


For the sauce:

2 tablespoons soy sauce

1 tablespoon dark soy sauce for color (optional)

1 tablespoon fish sauce

1 teaspoon of sesame oil

1/2 tsp of sugar

1/8 teaspoon of white pepper (optional) 

A fairy dusting of monosodium glutamate (optional)

After you’ve prepared all your ingredients, place a pan or wok over high heat until screaming hot, about two or three minutes. Open your windows or turn on your kitchen hood. Add one tablespoon of the duck fat or cooking oil and swirl it around the sides of the pan. This is a technique known as longyau (熱油), and it helps make the wok non-stick. Add the eggs along with a pinch of salt and allow them to set for a few seconds, then scramble into fine curds. Remove from the pan and set aside when they are just barely cooked and still moist.


Wipe out the pan, add the rest of the duck fat and longyau again. Add your garlic and shallot and stir for about 30 seconds being careful not to burn the garlic.


Add the bell pepper and Thai chilis and stir fry for 30 more seconds. If you wanted to add or use other vegetables, add them in terms of hardiness, stir frying as you go for about 30 seconds each. Say you wanted to add carrots, corn, and frozen peas, add them in that order.


Add the rice to the pan before pouring the sauce around the sides of the pan. Toss to combine. I liked to flatten and press the rice along the bowl of the wok and leave it until I hear it crackle. This pan searing results in nice caramelization and crispy bits in the final dish. If you notice liquid in the bottom of the pan or wok, keep stirring the dish until it has all cooked off. Moisture is the enemy of a good fried rice.


Lastly, add the pineapple, basil, and shredded duck confit to heat through while preserving the color and delicate perfume of the basil, about 30 seconds. Serve immediately.


For plating, consider packing a small bowl with the rice and turning it upside down on a plate to create a dome. Garnish it with crushed peanuts and finely sliced spring onions or whatever else you’d like.

Cook Like a Monger: Pickled Royal Corona Beans

by Anna Glassman-Kaufman

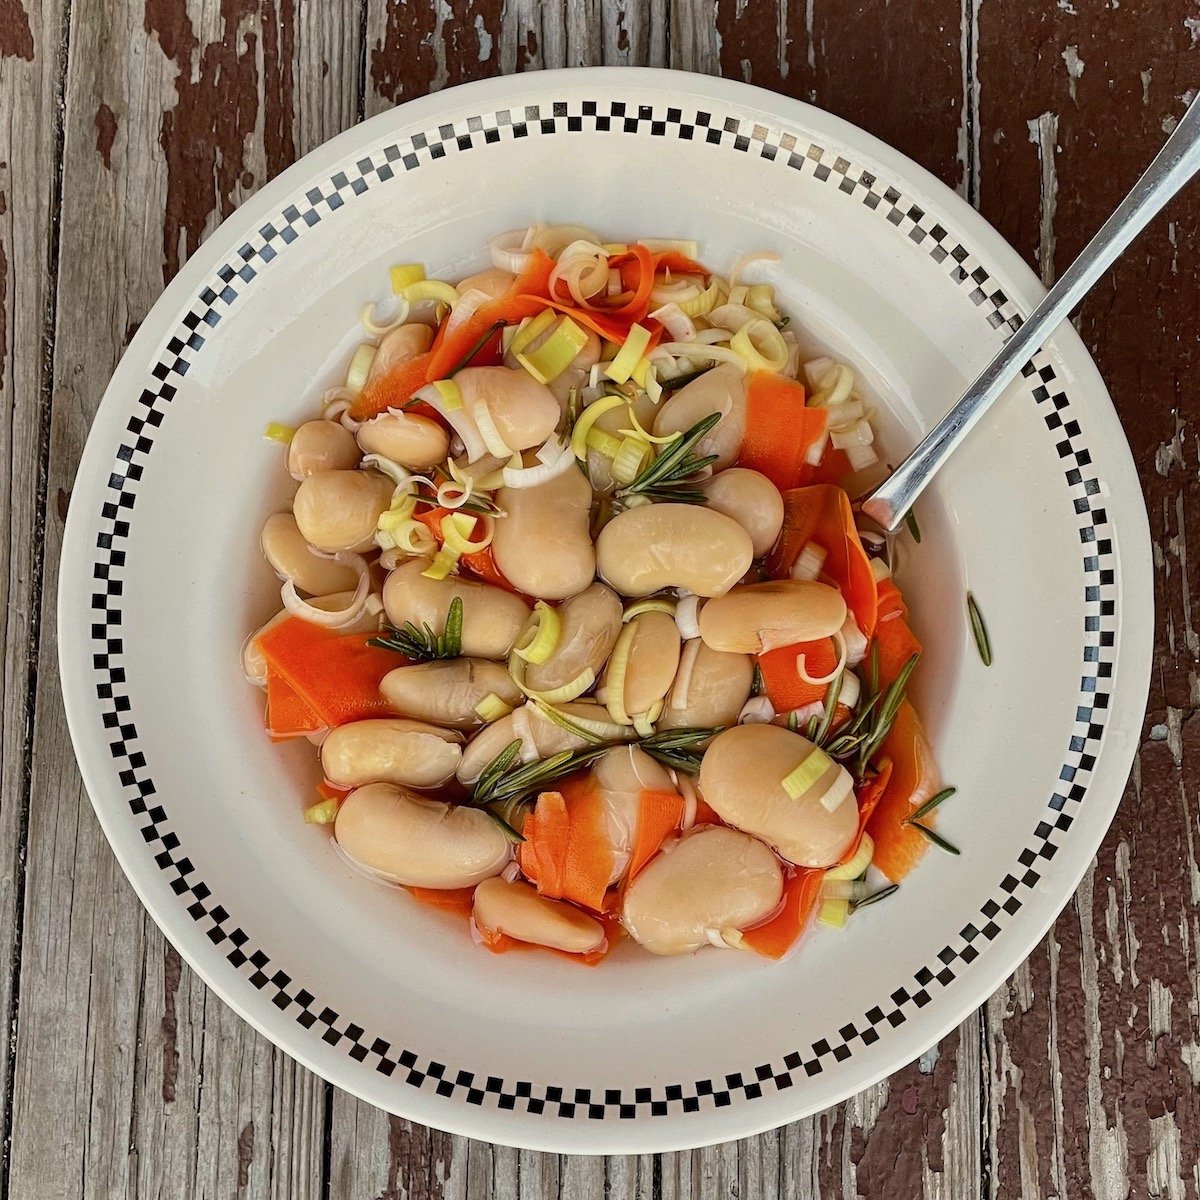
Beans are having a moment this spring. Rancho Gordo beans are truly something special, somewhat of a staff obsession - and their Royal Corona Beans are a personal fav. These beans have a thick skin and a creamy body. They’re giant and have an incredibly satisfying bite. My favorite preparation lately has been to pickle the beans, with a simple brine and whatever other vegetables I find in my fridge. If you don’t have the Royal Corona Beans, any other white or red bean will work well!

If you haven’t cooked dried beans before, don’t be intimidated! It’s TRULY easy, and makes a world of difference in flavor and texture when compared to canned beans.

1 cup dried beans

1 medium leek

1 medium carrot

A few sprigs fresh thyme, oregano, or rosemary

1 ¼ cups white vinegar

1 ¼ cups water

2 teaspoons salt

1 tablespoon sugar

To cook the beans, rinse them well in a sieve to clean. Then, cover the beans with about three inches of water in a small pot. Bring to a boil, then reduce heat to simmer and cook covered for about two hours, until beans are cooked through but hold together. Strain out the remaining water and rinse under clean cold water. Set aside.

Use a vegetable peeler to peel the carrot and slice into thin ribbons (a mandolin works here too). Slice the leek in half lengthwise, then wash well and slice in thin half-moons, starting about ½ inch from the roots, and up until the leek is bright green and becomes difficult to cut. Place the carrot and leek into glass or metal bowl and add your sprigs of fresh herbs and your beans.

In a small pot, bring the vinegar, water, sugar, and salt to a boil until the sugar and salt completely dissolve. Pour this brine over your beans, vegetables and herbs. Once cooled, place in the fridge for at least four hours before enjoying.

Enjoy on toast, as a part of your cheese/charcuterie board, or my favorite way, with a spoon right out of the bowl.

Cook Like a Cheesemonger: Cheeseboard Dinner


by Maura Rice

One of the things you hear most as a cheesemonger is something along the lines of: “OHMAHGERD, you’re so lucky, you must eat cheese all the time!” And while it’s true that we do sample our wares behind the counter from time to time (it is our professional obligation, after all), most cheesemongers I know… don’t actually eat that much cheese at home. I know! I know! Stay with me here.

They say that most chefs don’t spend more than five minutes cooking for themselves at home. It seems to me that the same goes for cheesemongers. If I do eat cheese at home, it’s 100% going to be a utensil-free, hand-to-mouth situation. Lately however, I’ve been thinking—I’ve made countless cheeseboards for family and friends over the years (it is, without a doubt, the coolest part about being a cheesemonger), but I’ve never extended the same luxury to myself.

If it were 2015, this post would undoubtedly be titled #treatyoself. Thankfully it’s not, and as mature adults we can appreciate the importance of self care, which in this case looks like making yourself a kick**s cheeseboard for dinner.

“Recipe” (feeds 1-???)

3 cheeses (The traditional school of thought says that you need a cow, a sheep, and a goat cheese—personally, I say choose what you like. In this case that was: Pleasant Ridge Reserve, Camembert dell’Alta Langa, and Blakesville Sunny Ridge. 2-4 oz per person is a good rule.)

Something sweet (Fresh fruit, dried fruit, chocolate, honey, jams—all good options)

Something sour (Pickles are great on cheese and charcuterie boards alike. The acid cuts through the rich, fatty flavors of meat and cheese. It’s like a breath of fresh air for your palate.)

Something salty (Salami, prosciutto, nuts, you get it)

Garnish (Garnishing is my favorite part of building a cheeseboard. It brings an often beige plate to life, providing important contrast, and generally making you look like you know what you’re doing. Any greenery goes a long way—try to fill in gaps in your composition. Blueberries and dried fruit are also great for this purpose.)

Composition:

Creating a cheese or charcuterie board is all about balance and contrast. As a general rule, I try to repeat colors or elements more than once, but no more than three times (see: blueberries, cornichons, strawberries, etc). This creates a balanced effect without looking like a garnish explosion happened on the board. Use large pieces like your cheese wedges to anchor the smaller elements. Try to have some extreme dark (jam, dried figs, blueberries) and light (cheese!) shades going on.

Importantly: when it comes to entertaining, show your guests how to consume the board. Cut large hunks into wedges or slices, stick a knife in large hunks of cheese, pour jam right on the board—diners are often timid about these things, so give them an excuse to dive in and get messy.

Lastly, know that there is no wrong answer when it comes to building a cheeseboard. Let your intuition and creativity guide you. I’ve seen cheez-its, kimchi, and jalapeños used on cheeseboards to great effect. Who’s to say that Spam, Oreos, and dragonfruit wouldn’t be fabulous in the right context? (And if you do make a board with these elements, PLEASE tag us.) Happy building–and more importantly, happy eating!


Cook Like a Monger: Coconut Coriander Pasta with KariKari Chili Crisp 


by Austin Coe Butler 

If you’re ever wondering what to gift the foodie in your life, may I suggest a subscription service of a gustatory nature? I’ve been gifted bean club memberships, artisanal salami subscriptions, and monthly coffee shipments, all to my great delight and surprise. They’re a great way to be exposed to new and different foods you may not have encountered in your well-worn eating habits. Most recently I was gifted a subscription to Sfoglini, a New York-based pasta manufacturer that is best known for inventing a “new” pasta shape, cascateli or waterfalls. A recipe for pasta with a coconut coriander sauce came along with that month’s pasta and I thought I’d give it a try. While the dish turned out beautiful and quite tasty, I couldn’t help but feel like something was missing, and it was only the other night when the spring weather stirred me to make it again that I realized what it needed to shine: the sweet, garlic-y heat of chili crisp oil. 

Chili crisps are “having a moment.” For the uninitiated, chili crisp usually refers to hot oil that is poured over chilis with other spices and aromatics to create a silken, fiery red oil that is good on literally everything. It’s the Sriracha of the 2020s. The Chinese Lao Gan Ma brand, with a stern looking woman on the front, exploded in popularity several years ago, and now it seems like everyone and their mother is making artisanal chili crisp. The Pura Macha brand salsa macha we sell in the shop, a Mexican chili crisp with lots of smoky guajillos, chipotles, nuts, coffee, and fruit, is exceptional and can turn something as plain as steamed chicken breast into a transcendent culinary experience. 

We recently brought a new chili crisp into the shop, Seattle-based KariKari, a Japanese-style chili crisp. What sets KariKari apart is that it is packed with golden slices of crispy fried shallots and garlic, which most chili crisps tragically skimp on. Many of the staff members, including yours truly, will openly admit to eating half a jar of it in one sitting, whether it’s paired with a cheese like Manchego, a decadent triple creme like Brillat Savarin, or just on plain noodles or a baguette. This chili crisp was what that pasta dish needed, and it totally transformed it, bringing all the flavors into balance with its sweet heat and leaving me craving more. KariKari chili crisp is on promotion this weekend, so stop into the shop to try it for yourself!

This pasta is an easy weeknight meal and can easily be made vegan with the substitution of coconut oil for butter.

Ingredients:

1 ½ tbsp coriander, toasted, and ground

4 tbsp unsalted butter

½ lb. or 8 oz. spinach

1 cup fresh or frozen peas

1 large yellow onion, sliced thinly

6 cloves garlic, minced or grated

1 lb. package of pasta, preferably a shape like rigatoni, busiate, or penne. I use cavatappi here.

1 in. knob ginger, minced or grated

1 14 oz. can unsweetened coconut milk

Cilantro leaves to taste

KariKari chili crisp to taste


Directions:

  1. Bring a large pot of abundantly salted water to a boil while you prepare your mise.

  2. In a Dutch oven over medium-high heat, melt 2 tablespoons of butter. Add the spinach and saute for just a minute or two until it begins to wilt. Then add the peas and heat them through, just another minute or two. Reserve the peas and spinach in a small bowl.

  3. In the same pot, add the remaining butter. Saute the onion until translucent and yielding, about 5 to 7 minutes. You’re not looking to develop any color, just soften the onions.

  4. Add the ground coriander and bloom the spices until fragrant, about a minute.

  5. Add the garlic and ginger and saute for another minute. Your kitchen should now smell amazing.

  6. Finally, add the coconut milk and bring to a boil. Reduce the heat to low, and simmer the sauce while you cook your pasta.

  7. Cook the pasta until 2 to 3 minutes before the time listed for al dente according to the package. My package of cavatappi said 9 minutes, so I removed the pasta at 6 minutes. The pasta will still be raw in the middle, but we’ll finish cooking it in the sauce so the flavors can marry.

  8. Add the pasta to the Dutch oven with the sauce along with a ladle of pasta water. Continue to stir the pasta and test it until it is cooked al dente or to your liking. A nice sauce should have formed in the pot from the addition of the starchy, salty pasta water. If it looks dry, add a half ladle of pasta water at a time. If it looks too watery, allow the sauce to reduce for a minute or two. Check for seasoning one last time, adjusting the salt as necessary.

  9. Serve, garnishing generously with cilantro, and a generous spoonful of two of glowing KariKari Chili Crisp.


Cook Like a Meatmonger: Lamb T-Bones with Blackberry Pan Sauce

by Matt Gruber

Lamb. Now, I'm not talking about The Treaty of Versailles, I'm talking about the delicious Ovis aries, or as we humble meatmongers refer to it: lamb. Mutton was a staple in the early 1900's but declined after WW2. Some time around 2010 the younger version (lamb as we know it today) began to gain popularity.

I was by no means raised on this variety of meat and never looked beyond the widely-consumed gyro meat. While that is a whole different scrumptious beast in and of itself (I have an adventurous at home recipe that the world isn't ready for yet... at least in writing) our cuts of lamb are the sleeper hit of the meat case. Compared to beef or pork, lamb has an earthy, rich, and sometimes gamey flavor, however all this is balanced with a slight sweetness. From a simple gremolata on a sirloin roast to a mustard and pistachio-crusted rack of lamb, we love to experiment with all kinds of preparations. In the spirit of Easter and spring, I created a wonderful blackberry pan sauce for some lamb t-bones. Paired with some roasted carrots, radishes, and mashed potatoes, I think this dish is perfect for any date night or holiday meal.

Ingredients:

2 Lamb T-bones per person

1 splash heavy cream

1 spoonful sour cream

1 sprig Fresh rosemary

1 tbsp ground thyme

2 tbsp dried oregano

15 blackberries cut in half (I used quite a bit due to my love of blackberries)

1 knob of butter

1/4 cup full body red wine, I used Leese-Fitch

1 cup chicken stock

2 russet potatoes

1 bag rainbow carrots

Directions:

  1. Season t-bones liberally with salt and pepper up to 48 hours in advance.

  2. Preheat oven to 450 degrees.

  3. Soak potatoes in cold water for up to 4 hours to remove starch. Once soaked, cut into 2" cubes.

  4. Toss carrots and radishes in olive oil, seasoning with thyme and oregano, plus salt and pepper. Lay on a sheet tray and roast for 25-30 minutes until browned.

  5. Boil potatoes in salted water until soft, 15-20 minutes, then mash with sour and heavy cream. Season to taste.

  6. When carrots are 10 minutes out from being done, preheat your favorite cast iron or heavy-bottomed skillet on medium, sear t-bones for 3.5 - 4 minutes per side for medium rare.

  7. Remove t-bones from the pan, setting them aside to rest. Add a knob of butter, wine, stock, blackberries, and rosemary sprig. Reduce until a spoon dragged across the pan leaves a streak in the liquid that stays a moment before vanishing.

  8. Plate lamb and veggies, drizzling with pan sauce. Enjoy!

Chicken Cacciatore

by Austin Coe Butler

While many regions of Italy claim ownership over this humble dish, which literally means “hunter’s style chicken,” it originated in Tuscany. Every family has their own “classic” version of this dish. It is also a dish that found popularity in America, where bell peppers, mushrooms, sage, and basil found their way in. Over the years I’ve found I prefer this simple, rustic version of chicken thighs simmered in a rich tomato sauce with briny capers, kalamata olives, and fragrant rosemary.

A curious culinary aside: This is one of the few “authentic” Italian recipes that features chicken. Most of the Italian chicken recipes that spring to mind are usually Italian-American in origin, when immigrants modified vegetable dishes for the abundant and cheap meat they found in the United States, for example substituting chicken for eggplant in “chicken parmesan.” In the cucina povera of Italian cookery, the poor coveted their chickens for their free supply of eggs, which could be cooked in an endless number of ways like frittata or uova in Purgatorio, and, of course, used to create pasta.

Ingredients:

4 chicken legs (You could substitute a whole chicken broken down or your cut of choice)

1 carrot, diced

1 onion, diced

1 rib celery, diced

2 sprigs of rosemary, plucked and chopped

1 cup dry white or red wine

2 tbsp tomato paste

1 500 g can Bianco di Napoli whole, peeled tomatoes, pureed

2 tbsp Les Moulin Mahjoub Wild Mountain Capers, rinsed and chopped

Twenty kalamata olives, pitted and chopped

  1. Make the sofrito. In a large pan over medium-high heat, add a generous amount of olive oil (about 5 tablespoons) and a clove of garlic. Add the carrot, celery, and onion and simmer for about five minutes. 

  2. Add the chicken skin side down, nestling it among the sofrito, and sear it for two minutes. Flip and cook for another few minutes. 

  3. Add the rosemary and chili while continuing to flip the chicken and stir the sofrito every few minutes until the chicken is nicely browned and the sofrito begins to caramelize. In this way, the sofrito will fry in the rendered chicken fat. 

  4. Deglaze with the wine and simmer for a few minutes (2-3) until you no longer smell the alcohol.

  5. Add the capers, olives, and tomatoes.

  6. Dissolve the tomato paste in about a ¼ C. of water and add it to the pan.

  7. Bring the sauce to a boil then cover the pan and drop the heat to low. Let it simmer for 15 minutes.

  8. Uncover the chicken, check for seasoning and adjust as necessary. Simmer for another 15 minutes, adjusting the lid as necessary to thicken the sauce.

Garnish with parsley and serve with a little bread to wipe up all that sauce and fa la scarpetta!

Order Online