Cook Like A Cheesemonger: Grilling Cheese

by Erin Gilliland

It's HOT out there, friends! To keep things consistent, we’re going 100% this week, and we’re grilling halloumi! 

Traditionally prepared from goat's and/or sheep's milk on the Eastern Mediterranean island of Cyprus, Halloumi is made to resist high heat. It undergoes a double heat treatment, which binds the proteins within, allowing it to resist normal melting temps. Its flavor is tangy and salty. Grilling it feels a little bit like magic, and eating it is pretty magical, too. 

Once cooked, it becomes beautifully crispy and savory on the outside and sensuously melted on the inside, similar to the consistency of a marshmallow when toasted. It's incredibly versatile! Try it pan-seared with eggs and toast for a Cypriot breakfast, or grill it with all those beautiful summer veggies from your garden for an easy go-to lunch or dinner. 

I love to utilize what’s in season, when flavors are the best and brightest version of themselves. This week I pan seared halloumi and cut up some stone fruits (cherries, peaches, plums). I added a handful of arugula and some beautiful heirloom tomatoes for a little brightness onto a heaping spoonful of rich full fat Greek yogurt. 

It was salty, sweet, and exactly what I wanted to consume during this sweltering week, and it made a perfectly balanced lunch. Pair it with a chilled red or a refreshing n/a beverage. 

Ingredients:

Halloumi cheese
1 cup of your favorite Greek yogurt variety (full fat tastes better, just do it ok) 
1 Yellow Peach

2 small red plums
½ cup ranier cherries 
1-2 heirloom tomatoes
Arugula 
EVOO to finish
Flaky sea salt to taste

 Directions:

1. Put a generous amount of greens or yogurt on a plate or shallow bowl. 
2. Slice fresh and juicy summer peaches, plums, rainier cherries, and heirloom tomatoes into one-inch pieces, and add to your plate. 
3. Cut your halloumi into half inch slices. If you plan on grilling your halloumi, oil with EVOO. If pan-searing, place a tablespoon of oil into a pan and heat until shimmering. 
4. Cook your cheese for 3 minutes on each side or until golden and crispy. Plate on top of your salad, and finish with a generous drizzle of olive oil and salt. 

THAT’S IT! YOU’VE WON! You can thank me in person when you come into the shop to grab your grilling cheese. I'll be waiting.

Cook like a Cheesemonger: Pork Chops with Rhubarb Agrodolce

by Erin Gilliland

I’m excited to revisit a series that gives our customers an opportunity to connect with our staff, that also additionally highlights products that we love. 

We have access to some of the best pork (from our partners at Pork & Plants) I’ve honestly ever had. Their soy-free pigs are housed in deep-bedded straw and fed grains are that are grown on their farm using sustainable and regenerative principles.

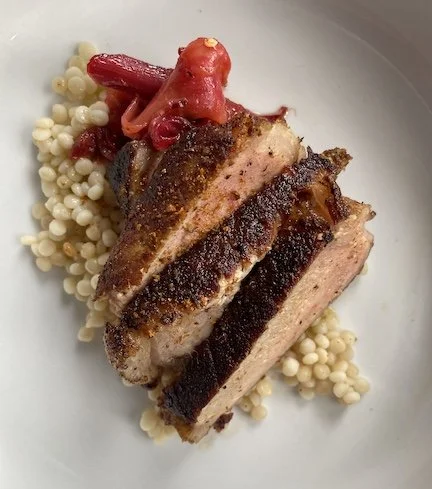
I hadn’t enjoyed a bone-in pork chop for awhile, and IT JUST SEEMED RIGHT! What pairs well with a perfectly cooked, melt in your mouth piece of meat? A tangy, sweet and sour sauce that will cut through all the richness of the pork.

Agrodolce is Italian for “sour” (agro) and “sweet” (dolce). A classic agrodolce recipe contains reduced honey or sugar, vinegar, pine nuts, and a mixture of dried fruits and veggies, such as golden raisins, red onion, or currants, but it varies. (Is ketchup secretly an agrodolce? 👀 Chew on that one for a minute…)

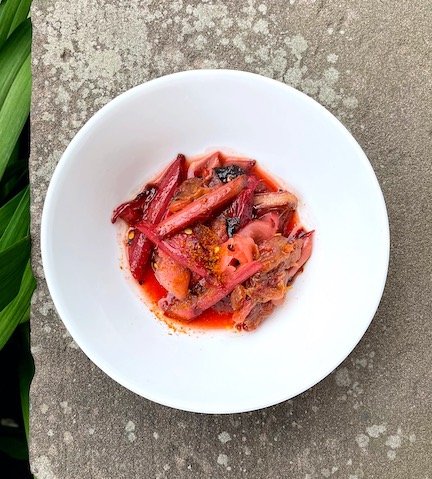
This is where it gets weird. I had a bunch of rhubarb in my fridge I was planning on making a tart with, it really needed to go. Everything has a savory side, right!? 

It turned out beautiful. 

Stop in and grab some pork chops! Slather them in a bright and beautiful sauce, serve with fluffy couscous, veggies, or a pasta salad from our deli. You won’t regret it. 

INGREDIENTS 

1-2 tablespoons oil of your choice 

1-2 Bone-in pork chops ( or T-Bones ) 

Kosher salt and freshly ground pepper

1/2 medium red onion, sliced thin

2 tablespoons brown sugar

2 tablespoons red-wine or sherry vinegar

1 pound rhubarb stalks, sliced into 2-inch pieces


RHUBARB AGRODOLCE

Heat the oil, onion and cook, stirring, until softened, about 2 minutes. Stir in sugar, vinegar and rhubarb. Cook, partially covered and tossing occasionally, until rhubarb is tender and the juices in the pan are thickened, 3 to 5 minutes. It goes fast! 

PORK

Pat the pork dry, and generously season with salt and pepper, and I mean generously. 

Cook them however you’d like, honestly. One of our meatmongers can gladly give you some advice! Grill ‘em! Sear them hard in a cast iron to get a crust, render off some of the fat (the best part IMO) and finish in the oven to your temperature preference. 

(Pro tip: save all those pan juices!!) 

Buffalo Mac-and-Artisan-Cheese

By Jared Kaufman

Serves 4

Few dishes celebrate the melty, gooey, comforting qualities of cheese quite like the classic macaroni. To turn the dial up a notch, this spicy stovetop recipe uses Barnburner, a smoky cheddar made at Grafton Village Cheese Company in Vermont and aged at Crown Finish Caves in Brooklyn, and Challerhocker, a double-cream alpine-style beaut from Switzerland with a fudgy, roasty flavor. 

And if you have never tasted our house-made ranch dressing, you’re missing out. It ranks among the best ranch dips I’ve tried, and it’s really what makes this recipe pop (no offense to the cheese, of course).

From France 44:

·         ½ lb. Barnburner

·         ½ lb. Challerhocker

·         1 pint F44 ranch dressing

From your pantry:

·         1 lb. large elbow macaroni (or your pasta of choice)

·         ½ cup unsalted butter

·         ½ cup all-purpose flour

·         1½ cups milk

·         ½ cup Frank’s RedHot (use more or less to your liking)

·         3 stalks celery

·         Scallions for garnish

·         Optional: Chicken, cooked + chopped or shredded

Instructions:

1.       Cook the pasta according to the package directions. Drain and set aside.

2.       Meanwhile… prep your ingredients. Remove the rinds from both cheeses and grate into a bowl. Chop the celery into small dice.

3.       Start the sauce. In the empty pasta pot (or another stock pot) over medium heat, melt the butter. Add the flour and immediately whisk to combine. Continue whisking for about 1 minute to let the mixture darken slightly.

4.       While still whisking, add the milk. (The mixture will suddenly tighten in texture; this is OK!) Add the ranch, hot sauce, and cheese, and fold together. Continue stirring until the cheese melts and the sauce is very smooth and well-combined.

5.       Finish the sauce. Remove from heat, and stir in the celery and chicken if using.

6. Combine the cooked pasta with the sauce. Garnish with finely chopped scallions and an extra drizzle of hot sauce if you so choose. Enjoy!

Moroccan-Inspired Kefta (Meatballs)

By Jared Kaufman

Serves 4

If you’ve read my recipes for this blog, you might gather that I’m obsessed with the New York Shuk line of Middle Eastern condiments and spices. They recently released their take on matbucha, a North African roasted tomato and pepper sauce, to which they’ve added olives and mint. It’s fantastic, and makes the perfect base for this Moroccan-inspired kefta (meatball) tagine dish.

I served this with Israeli couscous and honey-glazed carrots roasted with Moroccan spices. But you can get creative — we have a fantastic Tunisian couscous from Mahjoub in the shop, which you can prep with almonds and herbs to match the flavors of this dish. Or just grab one of our Rose Street Patisserie baguettes and dig right in!

From France 44:

·      1 lb. ground lamb

·      1 jar New York Shuk matbucha with olives and mint

From your pantry:

·      8 oz. can tomato sauce

·      ½ a yellow onion, minced

·      2 tbsp finely chopped parsley

·      1 tbsp finely chopped mint

·      1 tsp sweet (hungarian) paprika

·      1 tsp cumin

·      ½ tsp cinnamon

·      ½ tsp coriander

·      ½ garlic powder

·      Olive oil

·      Salt and pepper to taste

Instructions: 

1.     Start the tomato sauce. In a wide saucepan over medium heat, pour in the jar of matbucha. We’re cooking it down a little to concentrate the flavors. Stir occasionally. Meanwhile...

2.     Make the meatballs. In a large bowl, combine the lamb, onion, parsley, mint, and spices. Mix with your hand or a spatula just to blend, but do not overwork the meat or your meatballs will be tougher.

3.     Form small, quarter-sized meatballs.

4.     Meanwhile… into the pan with the matbucha, add the can of tomato sauce and stir well to combine. Drop the heat to low, so it sits at a nice simmer.

5.     Sear the meatballs. In a small saucepan over medium-high heat, pour in a little olive oil. Drop in the meatballs and briefly sear them. We’re not cooking them through yet — just getting a little texture and flavor. (You can sear them in batches while you’re forming them!)

6.     Poach! Remove the meatballs from the pan and drop them into the tomato sauce to finish cooking. Simmer together for 10 minutes. Enjoy!

Sophia's "invisible" tomato sauce

‘Invisible’ Tomato Sauce 

Invisible tomato sauce is the perfect pasta pairing when you crave warm summery nights. Bursting cherry tomatoes and melting anchovies give this pasta sauce tons of flavor. It’s perfect  for actual summer nights too, since it only takes the time your pasta needs to cook. It’s fun to let the cherry tomatoes burst slowly on their own, but if you need them to hurry up a bit, you can add some pasta water to the sauté pan and cover. 

Ingredients- 

Pint Cherry tomatoes* 

Olive Oil* 

Linguine* 

2-4 anchovy filets* 

3 large garlic cloves*, chopped

Chili flakes to taste* 

Optional-

Nutritional Yeast or Parmigiano-Reggiano* 

* all available at France 44 Cheese Shop

Get you pasta water boiling on the stove. Put a high-walled sauté pan on medium heat and add a few glugs of olive oil, around 2 tbsp. Pour tomatoes into the pan and let sizzle and burst, around 10 minutes 

  1. Add your pasta to the boiling water. Once the tomatoes are ¾ of the way burst and most of the juices have started to run out, add your anchovy filets, garlic, and chili flakes. Mix so the anchovies melt, the garlic becomes fragrant, and the chili doesn’t burn. If the pan looks a little dry, add more olive oil or pasta water. 

  2. When your pasta is a minute from where you want it, pull it straight from the pot and add to the tomato sauce. Let the noodles finish cooking with the tomatoes. Stir frequently and add more pasta water as needed to emulsify. Once the sauce is shiny and clinging to the noodles, turn off the heat and plate. Taste for salt and spice.

  3. With a dish like this, I don’t always want to weigh it down with dairy. On those days, I opt for nutritional yeast, one of my favorite garnishes with a nutty, savory flavor. On a rainy day like today, I went with Parmigiano-Reggiano for that distinct Parmy comfort. 

Almost Patatas Bravas

Jared’s Almost Patatas Bravas

 Serves 3–4

 One of Spain’s most famous tapas, patatas bravas are fried potatoes typically served with garlic aioli and a warm tomato sauce spiked with pimentón de la vera, or Spanish smoked paprika. This recipe reimagines the classic dish with France 44’s Paprika Parmesan dip for a hearty, cheesy (!!!) potato appetizer.

 Here’s how we’re switching things up. Instead of aioli, we’ll use garrotxa, a floral and earthy goat cheese from the mountains north of Barcelona. And in the sauce, New York Shuk’s harissa with preserved lemon adds not only spice but also a citric tanginess that pairs nicely with the cheese. You’ll need:

 From France 44:

 ·         1 bag of potatoes (about 2#)

·         1 container F44 Paprika Parmesan dip

·         1½  T New York Shuk harissa with preserved lemon (or more to taste!)

·         2 cups chicken stock

·         ¼ lb Garrotxa cheese

 From your pantry:

 ·         1 8 oz. can tomato sauce (I also tested this recipe with 1 cup of F44’s tomato soup instead and it worked very well!)

·         Kosher salt & pepper


Instructions:


1.      Start the potatoes: Cut potatoes into wedge-shaped pieces, about 12–16 per potato depending on the size.

2.      Pour the paprika parmesan dip into a bowl. Add the potatoes and about a teaspoon each of salt and pepper, and toss to coat.

3.      In a large nonstick skillet over medium heat, fry the potatoes until they’re tender on the inside, crispy on the outside, and deeply golden-brown. When they’re done, sprinkle on a little more salt.

 4.      Meanwhile, make the bravas sauce: In a saucepan over medium-low heat, combine the tomato sauce, harissa, and chicken stock.

 5.      Simmer, stirring frequently so the bottom doesn’t burn, until the sauce is reduced to about the thickness of ketchup (the final texture will be much grainier, though). Trust me, it’ll get there.

 6.      Assemble! Arrange potatoes on a plate and top with sauce. Grate plenty of garrotxa cheese over the top and enjoy with a nice full-bodied Spanish red wine!

Jared Patatas Bravas 1.JPG
Jared Patatas Bravas 2.JPG

Erin’s Lemon Ricotta Pancakes with Blueberry Compote

Top these fluffy golden babies with a thick and sweet blueberry sauce, or your favorite maple syrup and butter. And just like that, it’s the weekend. Or maybe it’s 7 PM on a Tuesday, but honestly, no one cares when you eat pancakes. Pancakes aren’t dependent on time. Pancakes are a state of mind. 


Ingredients From France44: 

American Spoon Wheat & Malt Pancake mix 

Locally Laid Eggs 

Fresh Blueberries (as availability allows)

Runamok Elderberry Maple Syrup 

Calabro Hand Dipped Ricotta 

 Ingredients from your Pantry:

Milk

Honey

Sugar

3 Lemons  (we have some if you need them)

Vegetable oil

Salt


FOR THE COMPOTE

2 cups blueberries 

1/4 cup sugar

2 teaspoons fresh lemon juice

3 tablespoons water 

Pinch salt 


To make the compote, combine all ingredients in a small sauce pan and cook over medium heat for 8-10 minutes, stirring occasionally until thick. Keep warm while you prepare the pancakes.


FOR THE PANCAKES

4 large eggs, yolks and whites separated 

¾ cup whole milk

2 tablespoons honey

2 tablespoons vegetable oil

zest of three lemons

1¼ cups American Spoon Wheat & Malt Pancake Mix

¾ cup whole milk ricotta cheese

pinch of salt


For the pancakes combine the egg yolks, milk, honey, oil, and lemon zest in a large bowl and whisk mixture until smooth. Using a rubber spatula, fold the pancake mix into the wet ingredients. Place the egg whites and salt in a clean bowl and whip until the whites hold soft peaks. Be very careful when you separate the eggs. Any yolk (or other fat, oil, or grease) that makes its way into the whites will keep the whites from whipping up as big and fluffy as possible. 


Fold the whipped whites and the ricotta into the batter, making sure to maintain the texture of both the ricotta and the egg whites. (I believe in you)


Heat a large pan over medium-high heat. Coat the surface of the pan with a thin layer of butter. Scoop the batter onto the pan, measuring out about ¼ cup for each pancake. Cook until bubbles form on the top of each pancake, 3-4 minutes, then flip and cook on the other side until golden. 


Repeat until all the pancakes are cooked. Top with reserved blueberry compote. Add some butter because you feel like it. Maybe get a little wild and pour some Runamok Maple Syrup on top, too. Cut into those cakes and never look back. 

pancakes1.jpg
pancakes2.jpg
pancakes3.jpg

Erin's Easy Weekday Ramen

I have yet to find the wherewithal to conquer my own ramen tare (flavor base) from scratch. I don’t dream of blanching and boiling pig bones on my stove for 12-18 hours for tonkotsu broth, and since I’m fresh out of Japanese kelp, I’m not making dashi (stock) anytime soon. 

 As it stands, I don’t need to. Our cheese shop has multiple ramen bases that are honestly, pretty excellent. 

 This ramen recipe is flexible. You can add other proteins or vegetables if you’d like, and omit those that don’t appeal to you. The one thing I love about ramen is its versatility and infinitely customizable combinations to suit every season, taste, and diet.

 The ramen broth I’m using has a matsutake mushroom and shoyu (soy) base. It’s topped with crispy pork belly, jammy eggs, shiitakes, and garnishes from your pantry or fridge. 

Pork Belly and Mushroom Ramen 

(Serves 1-2)

Ingredients: 

 From France44:

Pork Belly Confit 

Professional Ramen Base (Matsutake)

Locally Laid Eggs  

From your pantry:

Scallion 

Ramen or noodles of your choice (2 packs)

Furikake, chili crisp in oil, sesame seeds/oil, or whatever seasonings you prefer. 

Mushrooms of any kind, or other vegetables (i.e. bok choy, bean sprouts, cabbage, pickled veg, etc)

Directions:

 Step 1: Crisp Pork Belly 

 This pork belly is already cooked, so all you have to do is fry the heck out of it. It’s been previously “confited” meaning it’s slow cooked in its own fat. 

 For this recipe, I recommend 2 oz. of pork belly per serving, but do as you wish. Cut your pork belly into equal slices. Each slice should be about an inch thick. 

 Use a cast iron, or a very heavy bottom skillet.  Add a teaspoon of canola oil (to prevent immediate burning) and place pork belly into pan. Cook on medium-high for a minute or two, and reduce to medium to render out the fat. 

Pan fry 4-5 minutes each side, or until it looks browned and crispy. Set aside. *Side note: fry some of your mushrooms in that pork belly fat, go on just do it okaaay* 


Step 2: Cook Jammy Eggs 

Bring a medium pot of water to a boil. Carefully add eggs one at a time and boil gently for 6-7 minutes. (Egg yolks should be shiny yellow and almost jammy; egg white should be just set.) Drain eggs and transfer to a bowl of ice water to stop cooking; let cool. Peel and set aside.

Step 3: Prep mushrooms or Vegetables 

I had some leftover shiitake mushrooms in my fridge, so I gently brushed them off and sliced them to desired size. I also thinly cut some scallion. You could use bok choy, cabbage, bean sprouts, or even pickled vegetables. Frozen corn. I’m not here to stop you. 

Step 4: Cook Noodles

 Cook noodles in a large pot of boiling water according to package directions until al dente; drain (no need to salt the water, as ramen noodles contain more salt than pasta). Do not use flavor packets. Set cooked noodles aside. 


Step 5: Heat Broth and Assemble 

When ready to serve, bring ramen broth to a simmer; it should be very hot. Just before serving, place noodles in a deep bowl, or divide into two, if sharing. Top with sliced pork belly, placing it off to the side. Slowly ladle hot broth over noodles. 

 Halve your jammy eggs, place in bowl next to pork. Place sliced scallions next to eggs. Add your mushrooms and vegetables. 

 Garnish with sesame seeds, furikake, spicy chili bean paste, or chili oil. 

Maybe you have some dried nori sheets and pickled ginger from the sushi you intended on making, but never did. No one’s judging. Slip those in there, too...   

ramen1.jpg
ramen2.jpg
ramen3.jpg

Sophia's Anchovy Toast

Anchovy Butter Toast 

This ode-to-the-anchovy toast-topper makes an excellent breakfast or hearty snack. I’ve made this several times, inspired by Sam Sifton’s Not a Recipe anchovy toast. Good butter and high-quality anchovies go a long way, but whatever you have in your pantry works. For the bones of this recipe, you’ll need anchovies, butter, and bread for toasting. Feel free to add anything else you think sounds good, like lemon juice or hot sauce for brightness. You can top your toast however you like. This time, I made one with sliced radishes and another with egg and chili flakes. You can make it in about 15 minutes in the morning (if you remember to set your butter out while making your first cup of coffee). Otherwise, the anchovy butter can be made the night before and stored in the fridge for an even easier, filling breakfast.


I want to take one moment to talk about butter. There’s a lot of good butter at France 44 and a lot of strong opinions about butter. If you’ve ever asked us about butter, someone has probably told you to get the gold foil wrapped Beurre de Baratte. For me, you can’t beat the Ploughgate Creamery Salted Cured Butter. Usually, I stay away from salted butter, but the Ploughgate Butter is the best butter I have ever had. Eat with a spoon good. If you are going for salted butter with this recipe, go for the Ploughgate which is not overwhelmingly salty. Otherwise, lean into unsalted butter. The anchovies have the salt covered.

anchovytoast1.jpg

Ingredients 

The Butter:

2-3 Ortiz anchovies in olive oil

2 oz Ploughgate Butter or unsalted butter at room temperature 

1 clove garlic, minced

Fresh lemon juice


The Toast:

Rose Street Patisserie Baguette (day or two old works great) or Baker’s Field Hundred Rye bread for a twist 

Toppings:

6 ½ minute egg

Chili flakes

Sliced Radishes 

To prepare the butter, 

  1. If topping with an egg, get a pot of water boiling on the stove.

  2. Place your softened butter in a small bowl.

  3. Mince anchovies. A smaller mince means they’ll blend more easily into the softened butter. But personally, I like a chunky anchovy moment. Add to butter.

  4. Mince garlic. Feel free to use a dash of garlic powder (or no garlic at all) if raw garlic isn’t your scene. Add this to the butter as well.

  5. Squeeze fresh lemon juice into the butter or add your hot sauce. 

  6. Using a fork, mix the anchovies, garlic, lemon juice, and butter together until well combined. This took me about a minute or two of steady mixing. 

  7. Always taste as you go to see what it needs. Acid? Black pepper? Probably not salt. Make any adjustments and set aside.

For the bread: 

  1. Slice your bread. For a baguette, I suggest a bias cut (with the knife at an angle instead of straight across). This way, you get larger pieces of toast. 

  2. Toast any way you like. I did a few minutes in the toaster, but the world is your oyster. Er, anchovy. 

For the toppings: 

  1. Your water should be boiling by now. Once it is, prep a timer for six and a half minutes. Six and a half minutes will yield a jammy, runny yolk. If you like your yolk firmer, set for a minute longer. 

  2. Using a slotted spoon, gently lower your egg into the water and start the timer. Fill a bowl with ice water and place in the sink. 

  3. Wash your radishes. Slice thinly. Set aside. 

  4. When you six and half minute timer goes off, scoop your egg out of the water with the slotted spoon and gently place it in the ice bath. Let it hang out. 

To assemble: 

  1. Place your toasted bread on a plate. Generously spread your anchovy butter on the toast. 

  2. For the radish toast, simply place the sliced radishes on the designated toast.

  3. For the egg toast, you’ll need to crack and peel your egg. Remember, a six and a half minute egg is pretty soft so you’ll need to be gentle. I like to gently crack both short ends of the egg on a hard surface and then gently roll the egg with light pressure to crack the rest of the shell. The ice water should have shocked the egg enough that the egg will peel with minimal effort. 

  4. Once peeled, slice in quarters and assemble on top of toast

The eggs are messy, just the way they should be. The radishes provide a nice textural difference. The butter should be briney, rich, and full of umami and acid. The egg toast needed some heat so I added some dried chili flakes on top. Like most good recipes, this toast is flexible and should be adapted to your preferences. Have fun!

anchovytoast2.jpg
anchovytoast3.jpg

SBL Farro-Mushroom Risotto

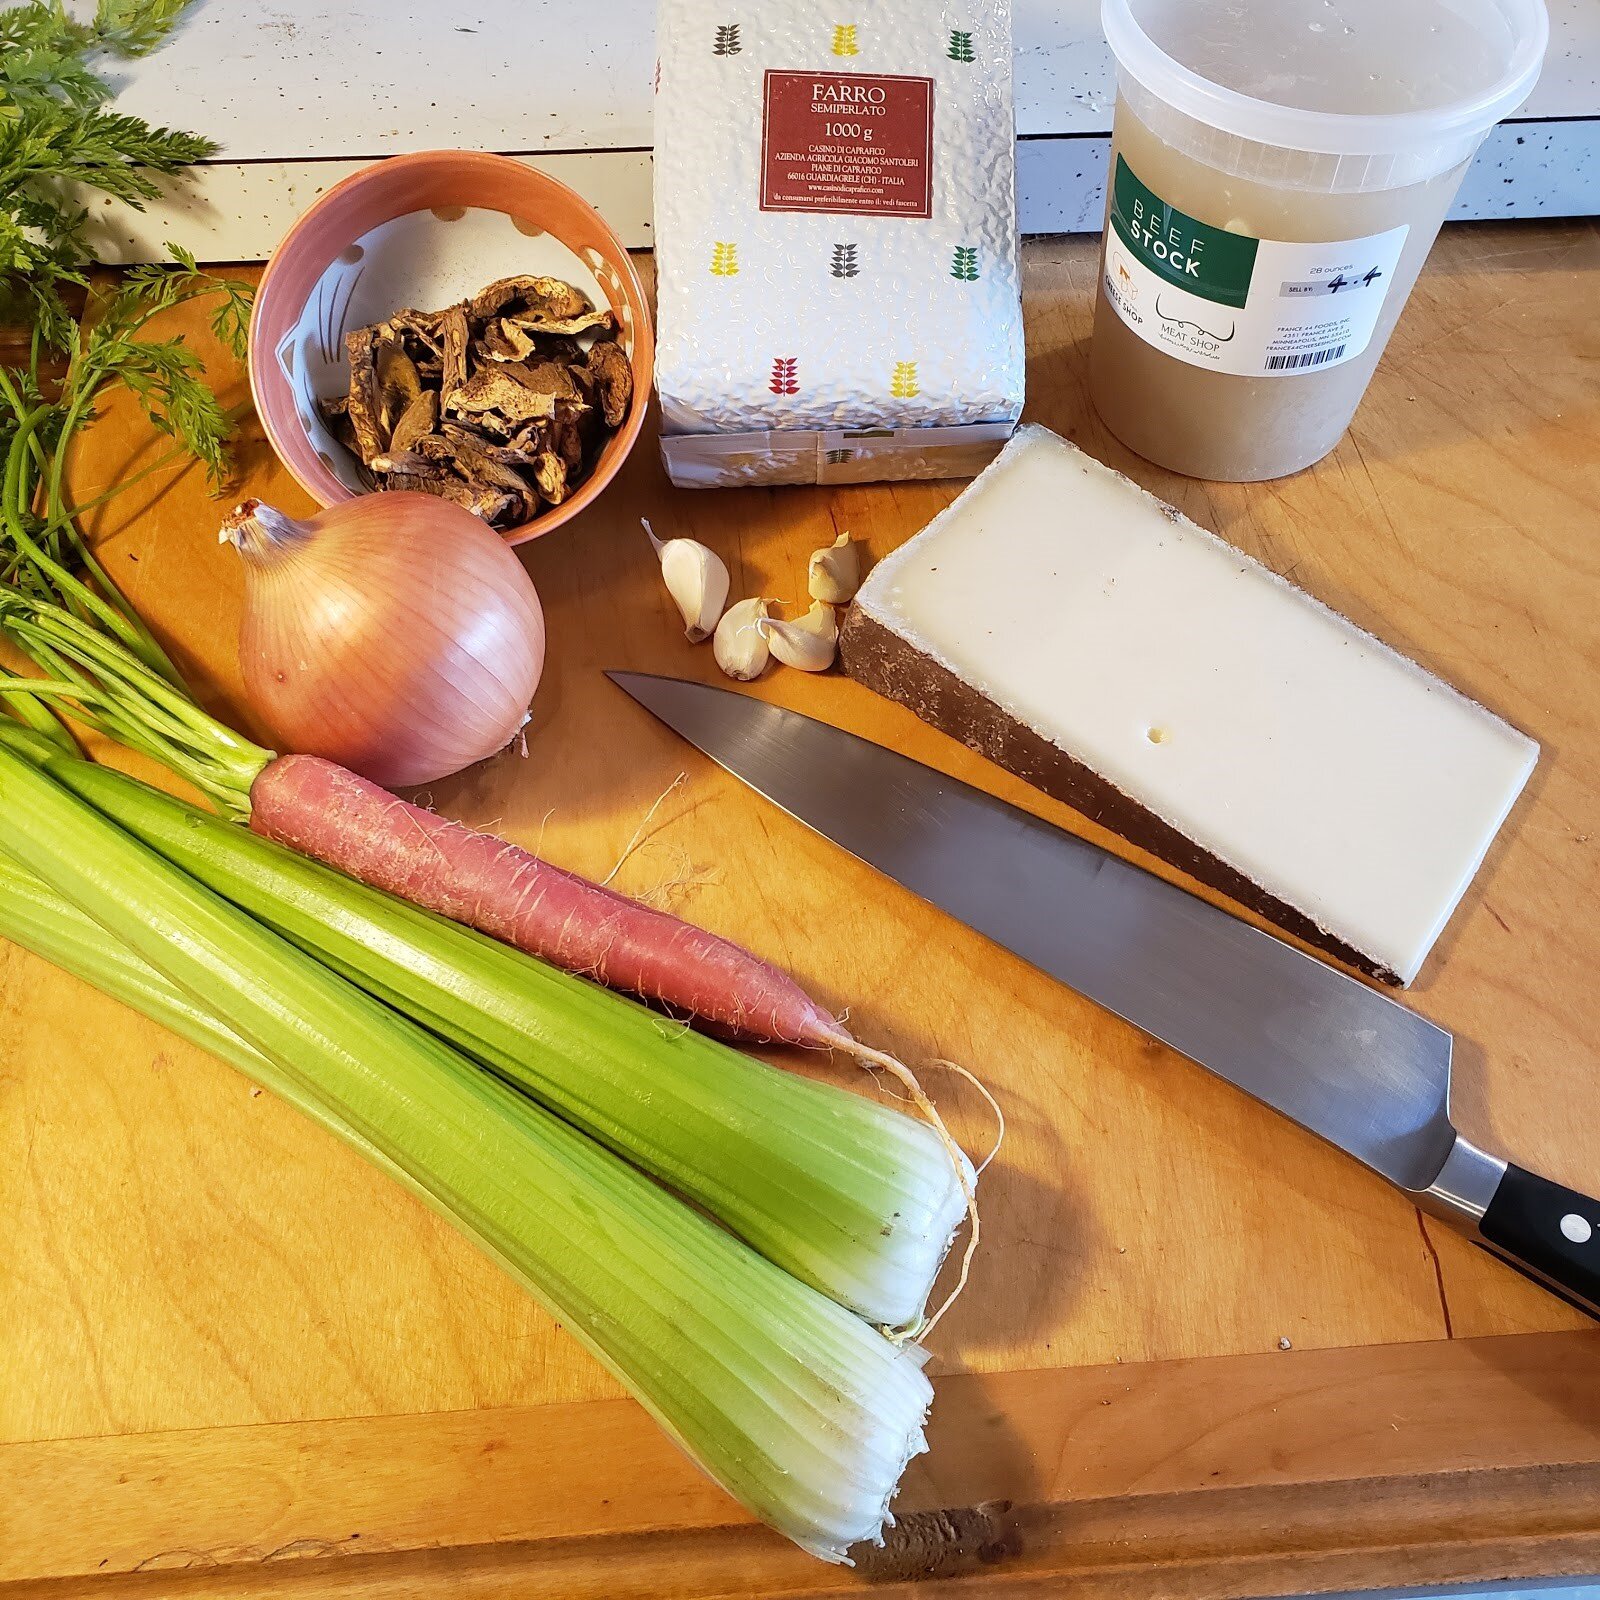
Carbs? Cheese? Wine? Yes please! Risotto is a classic rice dish from Northern Italy made from a few simple ingredients. With a little bit of elbow grease you can make stellar risotto at home. This preparation takes a few departures from the classic version you may know: I substitute Italian farro for rice, German Alex for Parmesan (blasphemy until you taste it!), and add in some celery and carrot to give it a little more body. Nutty and savory flavors from the farro, cheese, and mushrooms meet sweet lighter notes from the wine and veggies, and the whole dish is bound together with the best beef stock in town. And what better meal to eat with that bottle of wine you just opened?

Mushroom & Farro Risotto

2 c. (360g) Casino di Caprafico Farro

6 c. France 44 Beef Stock, simmering

1 Medium white onion, diced

2 Medium carrots, peeled and diced

3 Ribs celery, diced

4 cloves Garlic, minced

1 oz. Dried porcini mushrooms

6 oz. Alex (ask your Cheesemonger), grated and divided

½ c. Your favorite red wine

2 T. Extra virgin olive oil

2 T. Butter

Kosher salt

Black Pepper

Parsley to garnish 


  1. Soak mushrooms in boiling water for 30 min, or until tender. Drain, reserving soaking liquid, and chop. Set aside

  2. In a large dutch oven, heat olive oil and butter over medium high until shimmering. Add onion, carrot, and celery with a pinch of salt. Cook until onions are translucent and tender.

  3. Add garlic. Cook an additional minute or until fragrant.

  4. Add farro and mushrooms and turn to coat evenly.

  5. Add wine. Stir until alcohol has cooked off.

  6. Introduce hot stock to the pot one ladleful at a time, stirring constantly. Continue adding stock gradually and stirring until the farro has absorbed all six cups. The farro should be soft but still have some bite to it, and the sauce should be glossy and thick but not dry. If it needs more liquid, use the mushroom soaking liquid, more stock, or hot water.

  7. Add black pepper to taste and adjust salt. Stir in the Alex, saving a bit to garnish.

  8. Garnish with the rest of the cheese, parsley, and more black pepper.

farrorisotto.jpg
farrorisotto2.jpg
Order Online