Cook like a Meat Monger: Black Garlic-Glazed Chicken

by Matt Gruber

With the dawn of the new year, my favorite month is upon us: discounted chicken month. I could talk about our chicken until my jaw fell off: locally farmed, air chilled, pasture raised and all around delicious. Weekly it’s always one of our bestsellers, and we always love to chat about new recipes.

For 2023, I am really leaning into my love of flavors from across the world. A great Japanese proverb that sticks with me is, 七転び八起き (nana korobi ya oki) , which translates to  “Fall seven times, get up eight.” I want to challenge myself and take my cooking curiosity to its limits this year, mess ups and all. No matter how many times I cook a dish I will always look to refine and tweak it. Gravitating towards depth of flavor, freshness, and my love of all things umami, I wanted to see how many ways I could cram our black garlic molasses into my weekly menu. The Japanese syrup is made from 100% fermented garlic, but don’t let that scare you. The flavor is nutty and rich, but also surprisingly tangy. Landing on a whole chicken (duh, its January), I decided to try out a glaze for the poultry.

Knowing the sugar in the molasses would burn too quickly if applied at the start, I figured a glazing at the finish would be perfectly timed. To cut down on the thickness and intensity of the black garlic I cut it with some fantastic ponzu (a traditional sauce, typically sold in America as a mixture of soy and citrus)—it complemented the intense garlic flavor of the molasses quite well. Paired with, honestly, any of your favorite roasting veggies this dish will totally shine. I picked onion, snap peas, and celery (gotta clear out that produce drawer) and it accompanied it wonderfully.  

Enjoy on its own with the veggies or over rice—heck, eat a leg like you are at the renaissance fair! Cheers to a wonderful year of cooking and good food.

Ingredients:

1 whole 3-4 lb chicken 

1/3 cup Black Garlic Molasses

2 tbsp ponzu or soy sauce

1 yellow onion 

1 lemon 

Your favorite roasting veggies 

Salt, to taste

Directions:

  1. Preheat the oven to 425°

  2. Halve the lemon and the onion. Stuff one half of each into your bird.

  3. Slice your roasting veggies into uniform pieces. Toss them in oil and salt. Lay veggies on the bottom of your roasting pan. Top veggies with your whole chicken.

  4. Pop roasting pan in the oven and cook for 40-50 minutes.

  5. Meanwhile, in a small bowl, mix the black garlic molasses and ponzu/soy. Zest the remaining lemon half into the glaze. If using soy, juice the lemon half into the mixture as well.

  6. When your chicken reaches an internal temperature of 150°, apply the glaze to the skin and cook for an additional 10 minutes at 450º. Remove from the oven, and rest 5-10 minutes. Ensure that the final temp reaches 160º.

  7. Enjoy!

Risotto ai Funghi (Mushroom Risotto)

Serves 4-6 / Prep time 15 minutes / Cook time 30 minutes

Like so much of Italian gastronomy, there are many orthodoxies attached to risotto. A wooden spoon must be used. The rice must not only be stirred constantly, but in only one direction! As a result risotto has received a reputation as fussy and tedious. But I have found that risotto is an easy dish for the patient, and I personally enjoy unwinding in the kitchen with a glass of wine in hand.

There are risotto recipes that offer shortcuts like the use of a pressure cooker or the addition of a slurry, but I find those “time savers” lead to less flavor development. This recipe calls for two quarts of rich, full-fat chicken stock made to be reduced down into what is practically demi-glace. All those roasty, toasty flavors are concentrated into each grain of rice.

This dish can easily be scaled up or down, made vegetarian or even vegan with simple substitutions like vegetable stock, vegan butter, and nutritional yeast. Want to skip the wine? Substitute white balsamic for that same fruity acidity. What may surprise you is that the risotto is quite “soupy.” It should pool on the plate rather than form a stiff mass.

You will need:

500 g/1 package Principato di Lucedio Carnaroli Rice 

2 qts. Chicken Stock (France 44 makes an excellent one)

Half a white onion or one whole shallot, minced to roughly the size of a grain of rice

1 cup dry white wine like Pinot Grigio or an unoaked Chardonnay (I used L’Agnostique Chardonnay, which, at $12.99 and for its quality, is an absolute steal.)

1 cup freshly grated Cravero Parmigiano Reggiano

A sachet (about 1 oz.) of dried mushrooms (Here I use dried Porcini)

450 grams/1 lb. of fresh mushrooms (Here I use a combination of crimini, shitake, and beech mushrooms. I mince the crimini to fill out the risotto and leave the shiitake and beech larger for texture. The only mushroom I would not recommend for risotto is Portobellos. Their large, dark gills stain the risotto an unappetizing color)

1 tbsp White balsamic or sherry vinegar

Flatleaf parsley

Extra virgin olive oil

Butter

Salt

Black or white pepper

  1. Heat the oven to 425º F. Prepare your mushrooms by removing the stalks and brushing off any dirt with a paper towel or brush. Mince the majority of them while reserving some large pieces or clusters to roast off. Coat these roasting mushrooms in EVOO and salt. Roast for 15 to 20 minutes.

2. In a pot, bring the chicken stock to a simmer. Add the dried mushrooms, cut the heat, and cover to allow them to steep for five minutes. Remove the rehydrated mushrooms and mince, reserving them alongside the fresh mushrooms. I like to add the mushroom stalks and onion scraps to the stock at this point to minimize waste and maximize flavor, being sure to ladle the stock through a hand sieve to catch any debris. 

3. In a large pan or saucier, melt a generous knob of butter (about 2 tbsp) and a “thread” of olive oil (about 2 tbsp) over medium-high heat. Add the minced onion or shallot and sweat. Once translucent, add the minced mushrooms and a pinch of salt. We want to drive out as much moisture as we can from the mushrooms. Scrape any bits you see sticking to the pan. I recommend a wooden spoon for this task. As an extension of your arm, it allows you to feel if something is sticking on the bottom of the pans and the ability to scrape it into delicious fond before it burns and without scratching your pans.

4. Add the rice to the pan and toast it. If the pan looks dry, add more EVOO. You will notice the grains turn translucent around the edges and a pleasant nutty aroma, about three or four minutes. Deglaze with the white wine, making sure to scrape up all that delicious fond on the bottom of the pot. Deglaze yourself with some wine at this point if you haven’t already.

5. At this point, the cook time depends on your comfort and confidence. I prefer to cook over a medium flame, which generally takes about 17 minutes or so. This step of the cooking process is often the most stressful for home cooks, but take a deep breath, bump your favorite retro Italian hits, and have a glass of wine. You are simply adding stock to the pan, stirring, and adding stock when the pan begins to dry. Once the stock has reduced, add another ladle or two and continue this process until the rice is cooked, about 17 minutes. If you run out of stock you can use hot water at this point—there’s plenty of flavor in the rice and sauce. You can also cook the risotto at a lower temperature if you feel like the stock is evaporating too quickly. Like pasta, risotto is best al dente, so I start checking the rice around the 14 minute mark by sampling a grain or two. It shouldn’t be crunchy or grainy, but toothsome. You should be able to feel the individual grains. Remember that it will continue cooking off the heat.

6. Off the heat, add any remaining remaining stock, a knob of cold butter, parsley, the Parmigiano Reggiano, and a thread of EVOO. Stir, then cover, cut the heat, and let sit for two minutes. It will look too wet, but trust in the process. After two minutes, remove the lid and return the heat to medium. 

7. Now, MANTECARLO! (STIR IT!) Stir the risotto while shaking the pan back and forth. You should notice a rich sauce coalesce as the risotto thickens after just a minute or two. Add the white balsamic or sherry vinegar then serve immediately into warmed, shallow bowls or high sided plates—the benefits of a warmed dish cannot be overstated. A shake or two of the plate should level the risotto evenly. Top with the roasted mushrooms, Parmigiano Reggiano, parsley, and freshly cracked pepper. Buon appetito!

Have leftovers? Make some arancini by simply stuffing the balls of risotto with cubed Calabro whole milk mozzarella, rolling the balls in breadcrumbs and frying at 350º until golden brown. Ready to move on to the next level of risotto? Try Massimo Bottura’s mind-bending recipe for Risotto Cacio e Pepe.

Questions, comments, or cries for help about this recipe. cooking, or cheese at large? Ask your monger by sending an email to cheeseshop@france44.com.

Cook Like A Cheesemonger: It's A Dutch Pancake, baby

This large, fluffy “pancake," essentially a massive skillet popover, is excellent for breakfast, brunch, lunch and all times in between. And it comes together in about five blessed minutes of work.


Just dump all of the ingredients into a blender, give it a good whirl, pour it into a heated skillet sizzling with butter, and pop it into the oven.

Twenty five minutes later? Heaven. It's wonderful simply with powdered sugar and a little lemon, but I love to make it savory. I’ve topped mine with Ogleshield (an English raclette-style cheese that also happens to be on promo this weekend), our house smoked ham, and an over-easy egg. It’s absolutely perfect.

Serves 2-4

Ingredients:
3 large eggs, at room temperature
½ cup all-purpose flour
½ cup whole milk, at room temperature
1 tablespoon sugar
Pinch of nutmeg (optional)
4 tablespoons unsalted butter, cut into tablespoons
4 oz F44 smoked ham (our bacon would be delicious too!)
2 oz Ogleshield, sliced into thin strips
Fresh chives (or herb of your choice)
Salt and Pepper to garnish

Directions
Step 1:
Preheat oven to 425 degrees.
Step 2:
Combine eggs, flour, milk, sugar and nutmeg in a blender and blend until very smooth. Batter may also be mixed by hand.
Step 3:
Place butter in a heavy 10-inch skillet and place in the oven. As soon as the butter has melted (watch it so it does not burn) add the batter to the pan, return pan to the oven and bake for about 20 minutes, until the pancake is puffed and golden. Lower oven temperature to 300 degrees, top with cheese and ham, and bake 5 minutes longer until browned and melty. Use this time to cook your fried egg!
Step 4:
Remove from oven. Add fried egg and garnish with chives, salt and pepper. Serve immediately!

Cook Like A Cheesemonger: Ramen

Cold Weather, Hot Noodle Bowl


I have yet to find the wherewithal to create my own ramen tare (flavor base) from scratch. I don’t dream of blanching and boiling pig bones on my stove for 12-18 hours for tonkotsu broth, and since I’m fresh out of Japanese kelp, I’m not making dashi (stock) anytime soon.

As it stands, I don’t need to. Our cheese shop has multiple ramen bases that are incredibly delicious, as well a fantastic Japanese pantry. (A key note, you don’t HAVE to use ramen noodles. You’re welcome to use linguine, udon, and we carry multiple types of gluten free noodles as well.)

This noodle bowl recipe is flexible, with nearly unlimited combinations. You can add other proteins or vegetables if you’d like or omit those that don’t appeal to you.

The one thing I love about ramen and noodle dishes in general is their versatility and infinitely customizable combinations to suit every season, taste, and diet.

I included lots of different items from the shop that I’m really excited about, that I’ve been recently obsessed with.

One of those is a fantastic sea kelp kimchi that I buy a jar of practically every single week. Another is a chili crisp from Masienda--I've gone through a jar of every variety. We carry nearly all of these items in the shop, making it super easy to put this dish together.

As much as I love ordering take out, there is something incredibly special about putting a dish like this together yourself to share with someone. I hope you enjoy!

(Serves 2)

Ingredients:

1 (17oz) jar of (the aptly named) Professional Ramen Base, flavor of your choice
1 (250g) package of Ramen noodles, or noodles of your choice
2 eggs

2 oz dried porcini mushrooms

¼ cup SeaChi Kimchi
1 tablespoon of Masienda chili crisp
1 tablespoon Regalis Japanese Nori Butter (added richness if wanted, I highly recommend)
Radish for garnish (optional)
Sesame seeds for garnish (optional)

Step One: Soak + Fry the Mushrooms

Place dried mushrooms in a bowl of hot water for 30 minutes. Drain well, blotting with paper towels. Heat two tablespoons oil in a skillet over medium heat. Sear mushrooms until browned, 4-5 minutes.

Step 2: Cook Jammy Eggs.

Bring a medium pot of water to a boil. Carefully add eggs one at a time and boil gently for 6-7 minutes. (Egg yolks should be shiny yellow and almost jammy; egg white should be just set.) Transfer to a bowl of ice water to stop cooking; let cool. Peel and set aside.

Step 3: Cook your Noodles

Cook noodles in a large pot of boiling water according to package directions for al dente; drain (no need to salt the water, as ramen noodles contain more salt than pasta). Set cooked noodles aside.

Step 4: Heat Broth and Assemble! ​

When ready to serve, bring ramen broth to a simmer; it should be very hot. Just before serving, place noodles in a deep bowl, or divide into two, if sharing. Slowly ladle hot broth over noodles. Add your nori butter to your bowls. Top your noodles with your jammy eggs, kimchi, nori sheets, crispy mushrooms, scallions, radish, and chili oil.

Stay Warm!

Cook Like A Cheesemonger: Thanksgiving Leftovers

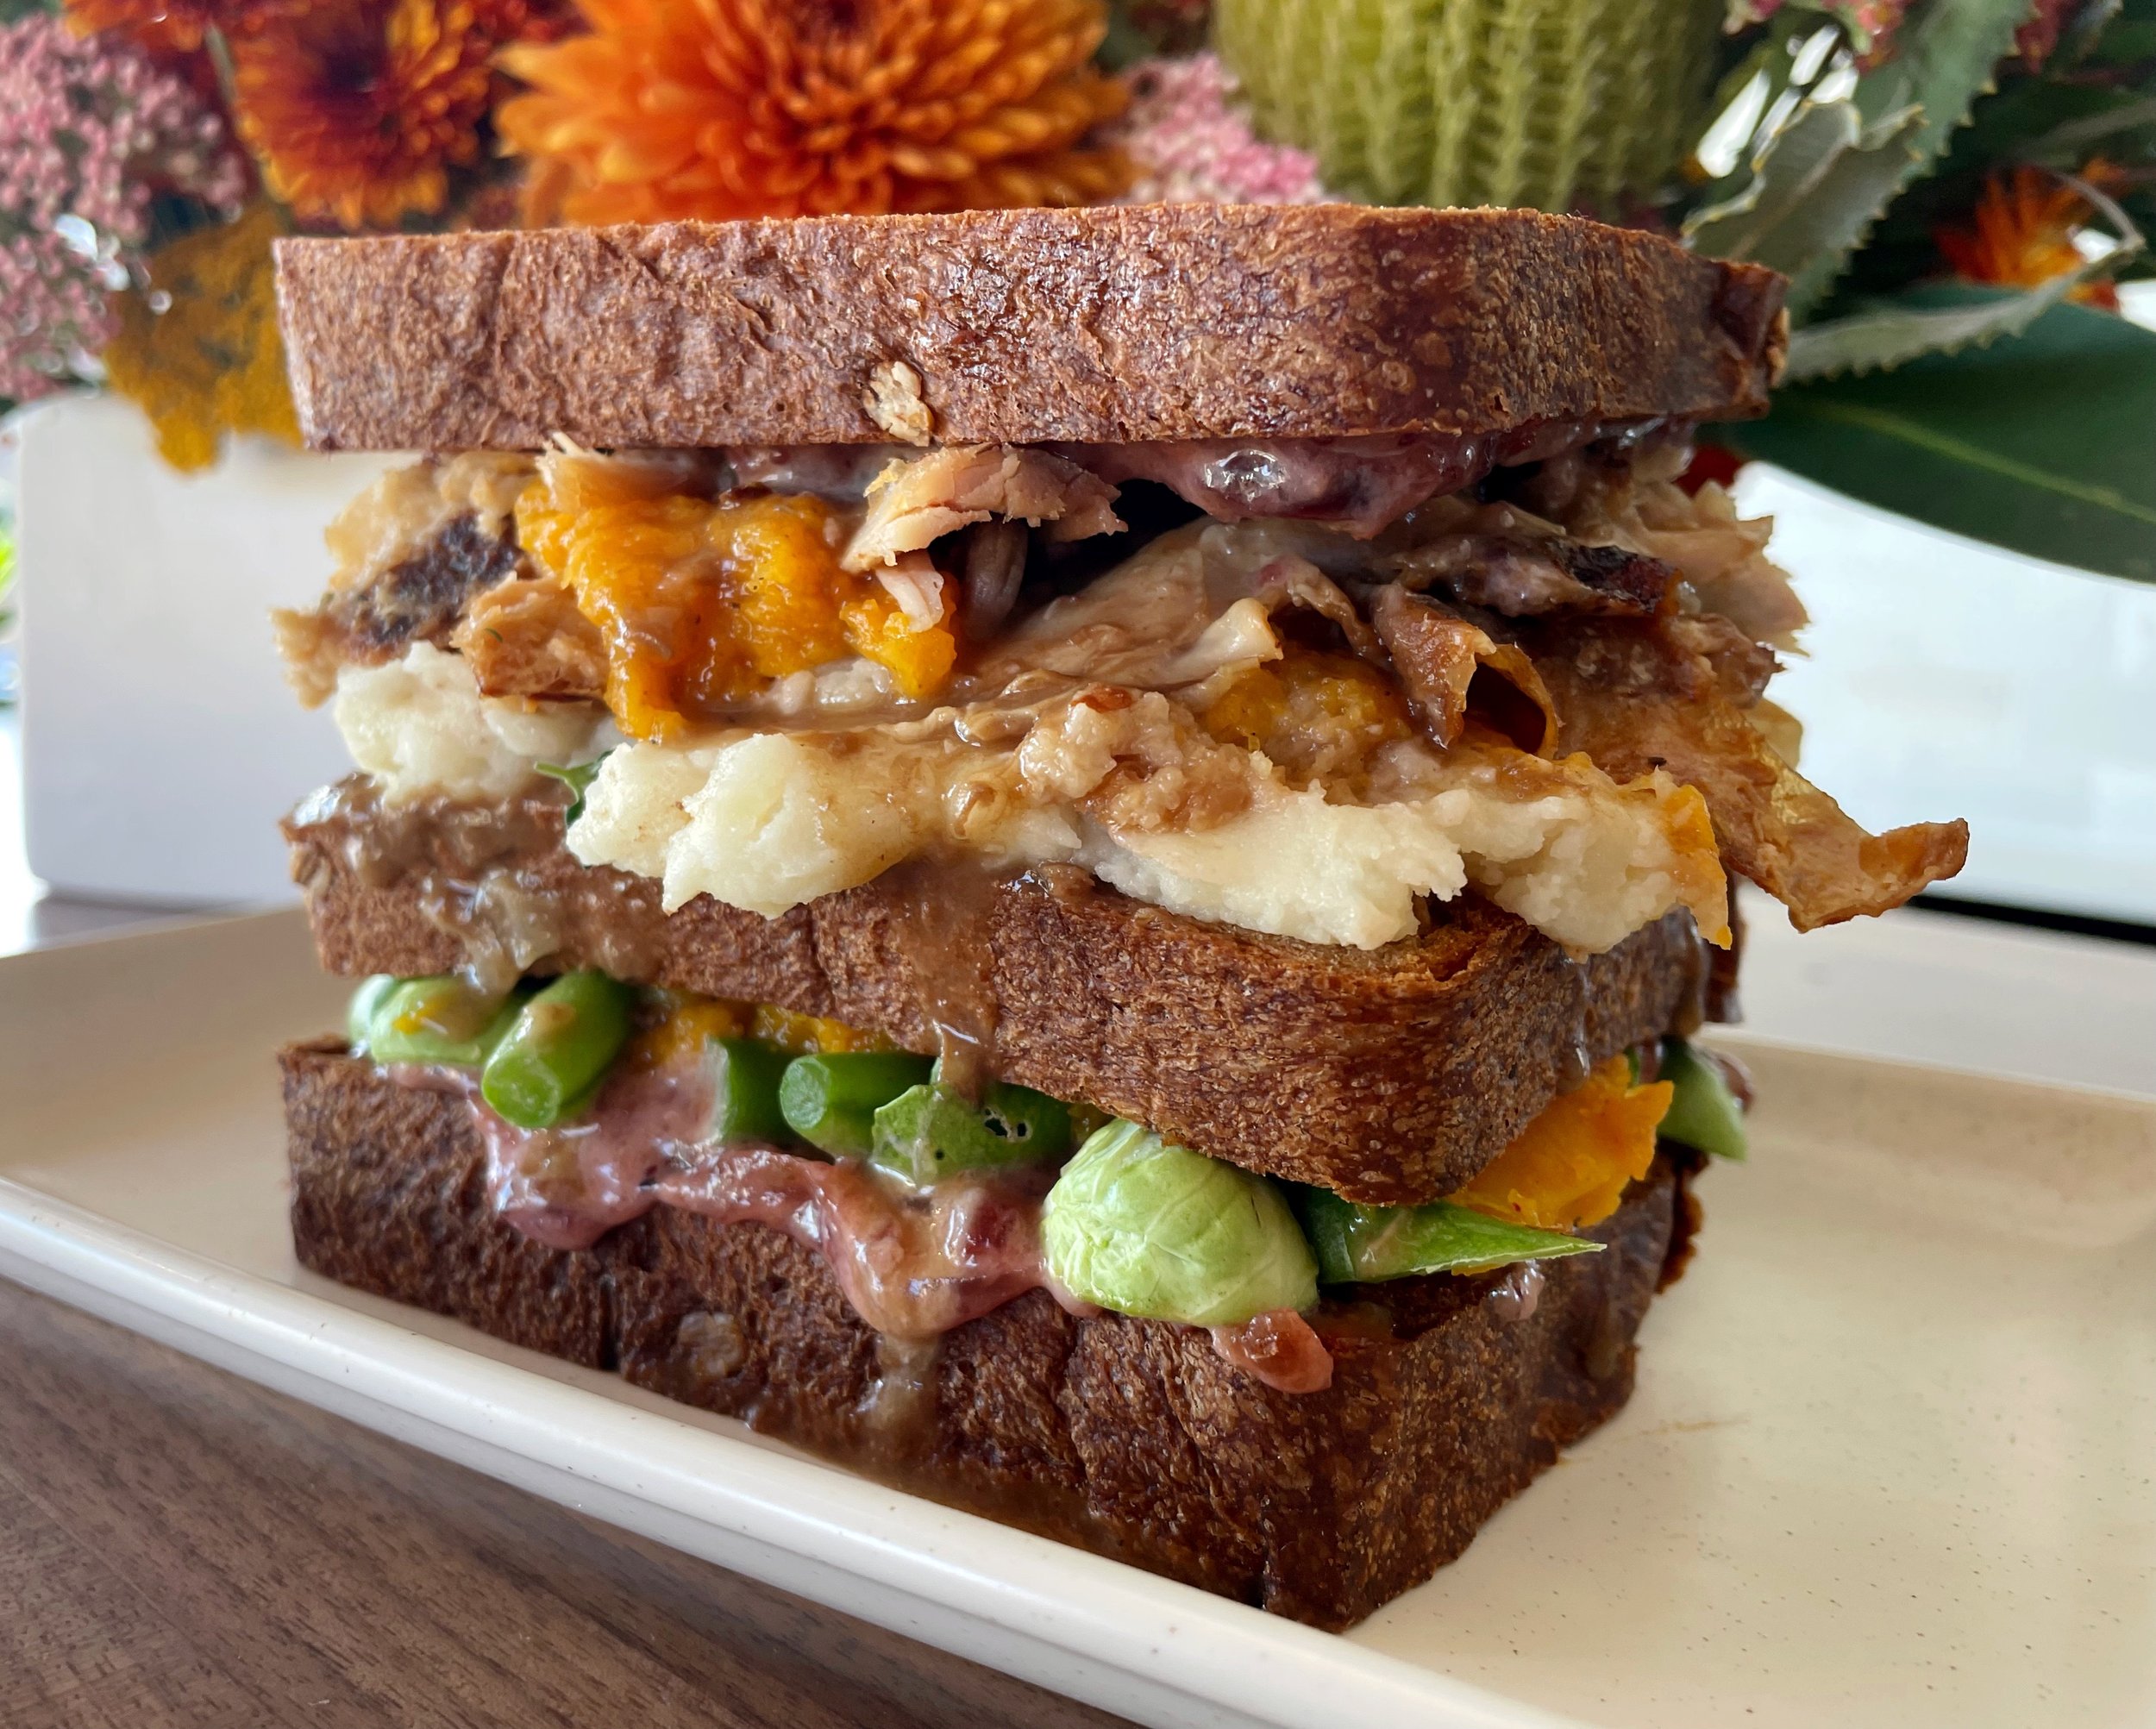
I love Thanksgiving food, but I think we all know it’s the day AFTER sandwich that really shines. It’s potentially, dare I say, better than the main event. It’s something that I look forward to every year, is incredibly easy to assemble, and is a delicious way to use your leftovers. The key for my “perfect” post Thanksgiving dinner sando is to press, chill, and sear the stuffing for added texture, as well as soaking a middle layer of bread in gravy for extra richness (If you’ve watched early 2000’s television, you know which F.R.I.E.N.D.S episode I’m referring to). Cranberry mayo makes everything better, and any kind of bread will do, but I love Goodwich’ of the North from Bakersfield Bread and Flour. It’s sturdy enough to handle the weight of all the ingredients, especially when lightly toasted. 

This is an excellent way to get all of those delicious flavors in one bite, and make the best use of all the extra sides you’ve shoved into your fridge the night before. 

(Makes 4 Sandwiches)

2 tablespoons butter, for pan

4 cups leftover stuffing

1/2 cup mayo 

1/2 cup homemade or canned cranberry sauce

2 cups shredded turkey (light or dark, or combo) 

1/2 cup leftover gravy 

2 cups assorted Thanksgiving leftovers (green beans, mashed potatoes, vegetables, sweet potatoes, whatever you’d like!) 

4 teaspoons neutral oil 

12 slices hearty bread (of your choice, I used Bakersfield Goodwich’ of the North) 

Salt and Pepper 

Directions: 

  1. Line and 8x8 inch pan with parchment paper and spray with oil or grease with butter. If your stuffing is cold, microwave it for 30 seconds. Press stuffing evenly into pan, and place another piece of parchment over the top, and press down firmly. Refrigerate overnight. You can do this after dinner so it’s ready for the next day!)

  2. Make your cranberry mayo. Mix equal parts cranberry sauce and mayo together, set aside.

  3. Toast 8 pieces of bread, lightly. Set aside.

  4. In a medium sauté pan, melt 2 tablespoons of butter. Crisp your turkey, flipping occasionally, until warmed through. Season with salt and pepper.

  5. Take your stuffing out of the fridge, and slice into 4 equal pieces. In the same sauté pan you warmed the turkey, rip up the heat to medium high, adding more butter if needed. Sear the stuffing on each side, pressing down with a spatula, about one minute for each square.

  6. Heat your gravy gently, until warm, in a medium sauté pan, and dip 4 pieces of bread on each side into the gravy. Set aside.

  7. Time to assemble! Spread even amounts of cranberry mayo on all remaining pieces (8) of toasted bread. Add your thanksgiving leftovers to the bottom layer. Top with your gravy soaked bread. Top that layer with your seared turkey, and more thanksgiving leftovers, more gravy, and the rest of the cranberry mayo, and put your remaining piece of toasted bread on top. Enjoy!

Cook Like A Cheesemonger: Tartiflette


Tartiflette is a traditional French baked dish of potatoes, cheese, bacon, cream, onions, and is truly Alpine gold. I’d be lying if I said I haven’t had something similar to this growing up in the Midwest, but it’s just another reason to celebrate how food unites us all the same. It originates from the Savoy (Savoie) region of France, famous for its beautiful mountains, cheese, and skiing resorts. One would typically enjoy Tartiflette in a chalet or lodge after a long strenuous day on the slopes. 

The traditional cheese used for this gratin is Reblochon, made from unpasteurized cow's milk. Because it’s aged less than 60 days, we’re unable to allocate it in the US, but that doesn’t mean we can’t succeed with this recipe, because we have all kinds of incredible options loaded in our arsenal to substitute for a game changing experience. 

Tartiflette is extremely easy to make. Practically fool-proof, to be honest. You’re literally just layering rich, decadent flavors on top of one another, and the end result will leave you speechless. If you need Thanksgiving side dish ideas, this is the crème de la crème. This is it. A true stunner. 

The first step is to par-boil some potatoes. Yukon gold are ideal. Par-cooking them guarantees even doneness. It also allows you to season the potatoes by salting the cooking water (a very important step!)

Instead of using bacon, I used our house-made F44 pancetta, and I softened all of my sliced onion in its rendered fat and deglazed the pan with a white wine (doesn’t have to be fancy). All you have to do next is toss your sliced potatoes into your cream (I used dollops of crème fraiche, actually, the acidity gives it a little va va-voom! and cuts through the richness) and you top it all off with decadent, thick slices of Camembert, Tallegio, or whatever other luscious melting cheese our mongers would suggest. 

Austin recommended Brie Fermier, Joe literally shouted “Grayson!” at me, but Ogleshield, or even Raclette, would be just fine in place of Reblochon. Take your pick, or go for something else in this general family of soft-rind, cow's milk cheese. 

There isn’t much more comforting than caramelized onions, potatoes, and pancetta, bound together with silky melted cheese and a crisp crust on a cold day. Make it all winter. We’re here to support you. 

Ingredients: 

(Serves 4-6 as a side, but is so easy to double if needed) 

2.5 lbs Yukon Gold potatoes 

1/4 pound slab or thick-cut bacon, or pancetta, cut into 1/4-inch lardons

2 medium yellow onions, thinly sliced

1/2 cup dry white wine

1/2 cup Vermont creamery crème fraiche

1 lb. Camembert Fermier (or similar) sliced into 1 inch pieces 

A handful of fresh thyme 

Salt and pepper 

Cornichons or apples, if you’d like on the side 

Directions:  

  1. Peel potatoes and cut into 1/2-inch thick rounds. In a large pot, cover potatoes with cold water. Season generously with salt, add thyme, and bring to a gentle simmer over medium heat. Cook at a bare simmer until potatoes are just tender and can be easily pierced with a paring knife, about 20 minutes. Discard thyme, drain potatoes, return to pot, and set aside.

  2. Adjust oven rack to middle position and preheat oven to 350°F. In a cast iron or stainless steel skillet, heat pancetta over medium-high heat until fat begins to render. Lower heat to medium and continue to cook, stirring occasionally, until fat is mostly rendered and pancetta is cooked but not crisp, about 5 minutes. Add onions, season with salt and pepper, and cook, stirring frequently, until onions have softened but not browned, about 6-8 minutes.

  3. Add white wine and cook, stirring, until wine has almost fully cooked off, 1 to 2 minutes or so. Add potatoes and toss gently to thoroughly combine.

  4. Carefully layer onion, pancetta, and potato mixture into a casserole dish, cast iron skillet, or bakeware of choice, dolloping crème fraiche in between each. If using cream, pour over the top evenly.

  5. Top your gratin with your 1 inch slices of cheese on top of your potato mixture, rind side up. Set skillet or baking dish on top of a rimmed baking sheet, and bake until the cheese is melted and bubbling and lightly browned on top, about 30 minutes. Garnish with fresh thyme, and enjoy!

Cook Like A Cheesemonger: Pumpkin Pancakes

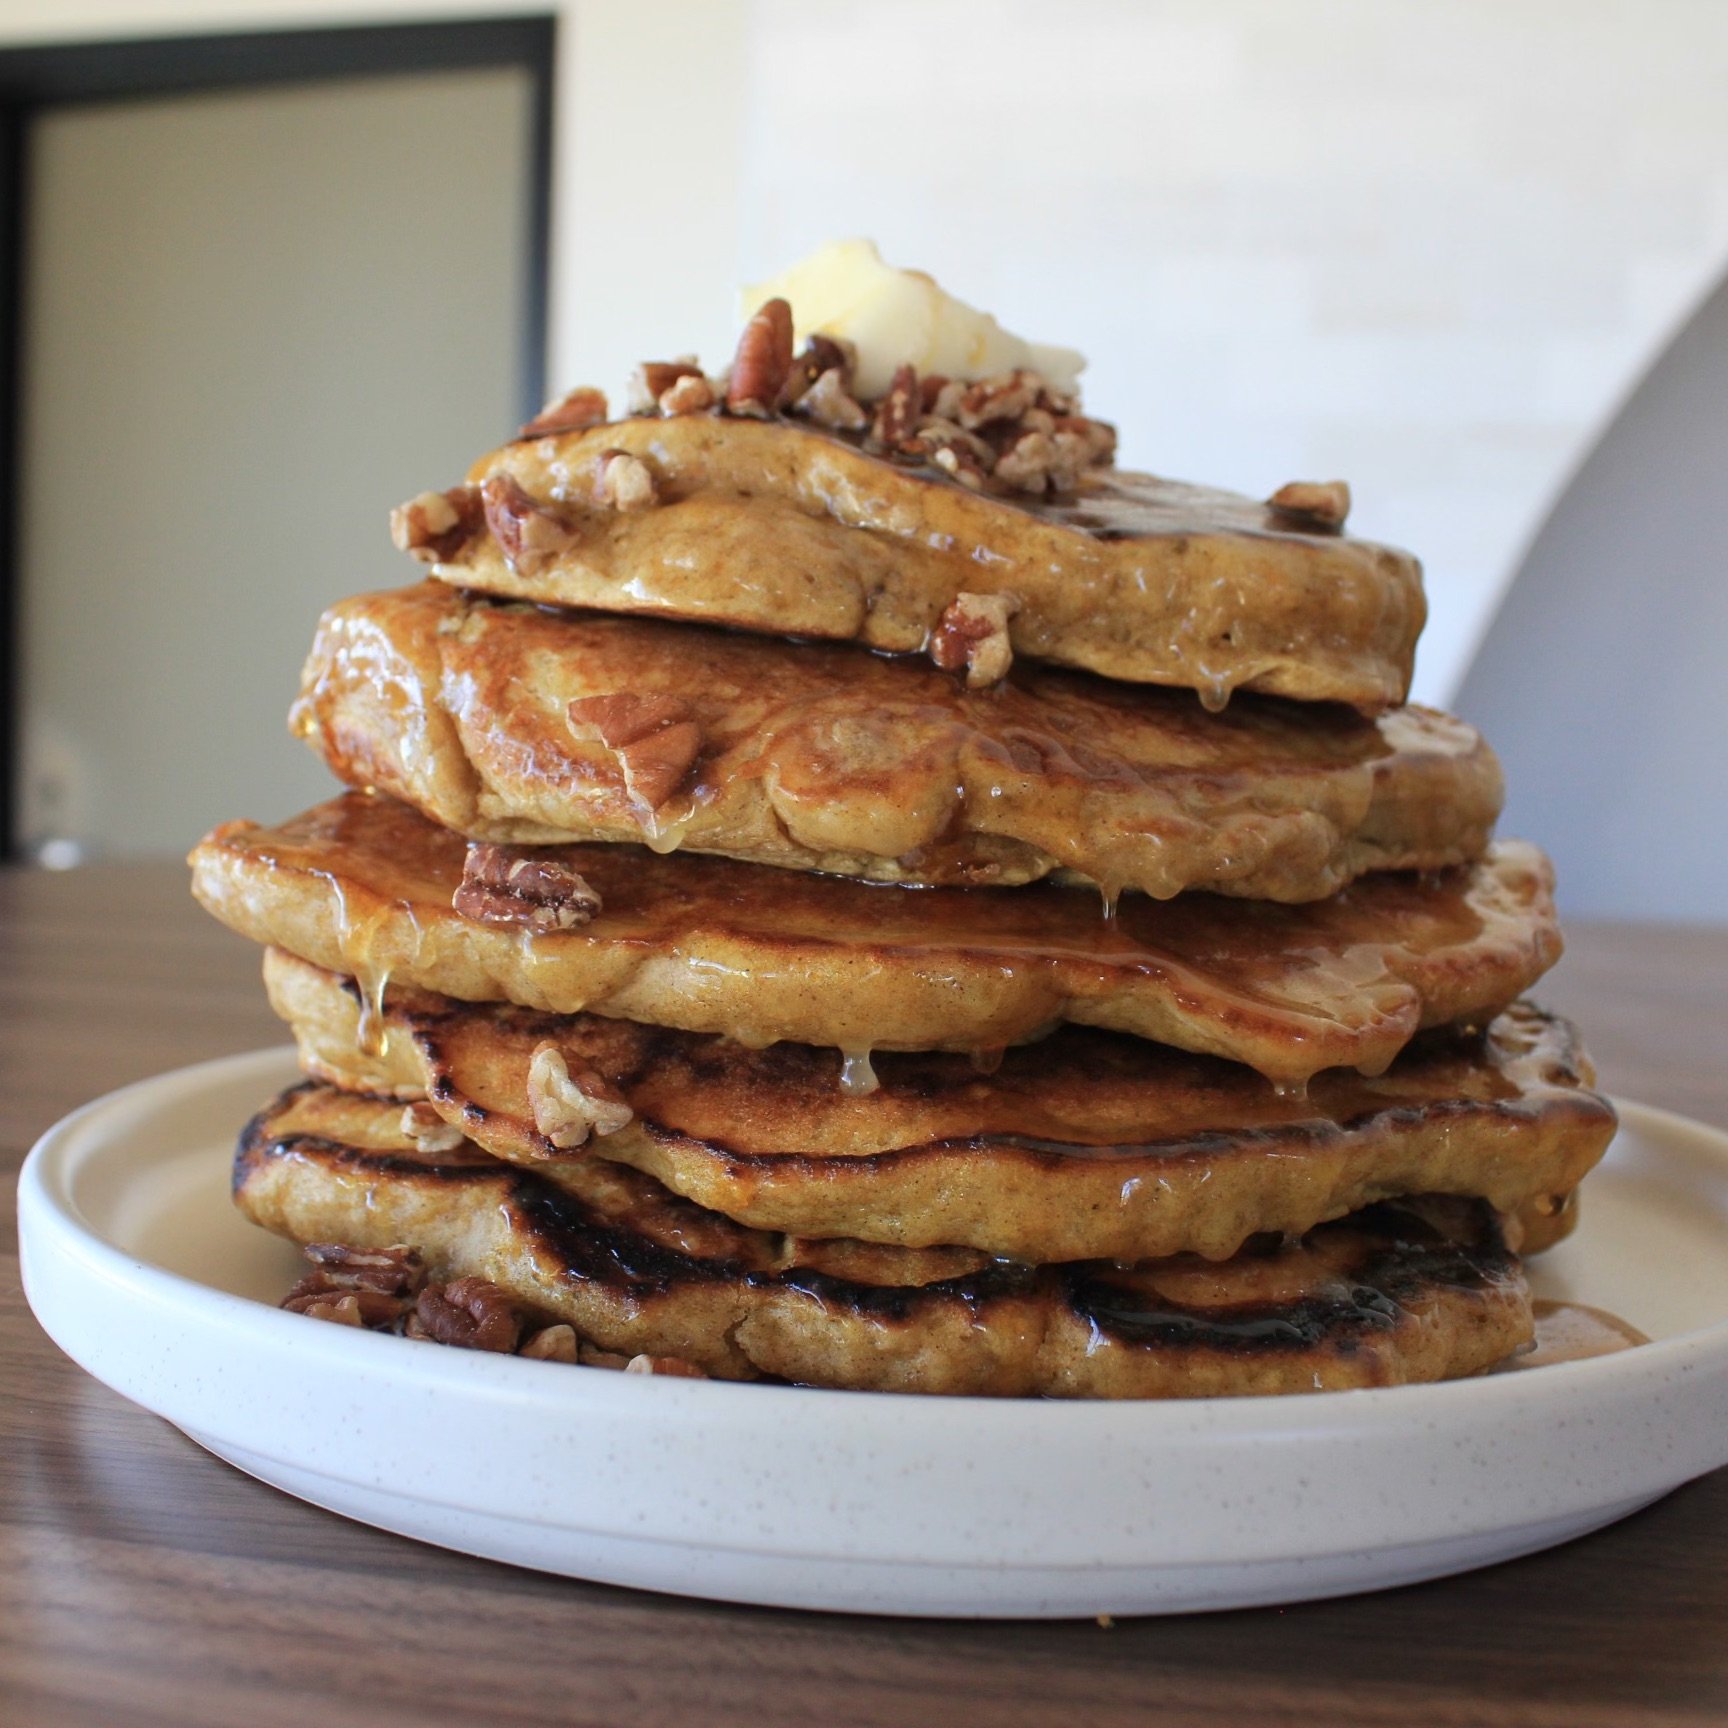
Confession: I’ve never had a pumpkin spice latte. I wouldn’t call myself a “PSL” hater, it’s just never something that I’ve craved, despite being a huge squash and gourd fan. However, I would eat these pancakes every single weekend if I could. What a better way to use up your pumpkins from Halloween. (Yes, you can absolutely eat your Jack O’ Lanterns)

Fair warning, they’re pretty decadent. You could eat this for breakfast, brunch, dinner, and absolutely for dessert. 

These pancakes get their substantial rise from the acid in the buttermilk interacting with the leavening agents; lightly beating the egg whites gives them the similar fluffiness you’d get from whipping whites, minus the elbow grease. Because the pumpkin adds extra moisture to the batter, it’s important to cook the pancakes low and slow so they can cook all the way through. 

I topped mine with our house roasted pecans, one of the most delicious cultured butters, and my favorite maple syrup we sell from Runamok. 

Batter Ingredients: 

2 large eggs

1 1/2 cups buttermilk

2 1/2 cups AP flour 

2 tsp. baking powder 

3/4 tsp. baking soda 

1 cup roasted pumpkin, squash, or organic roasted pumpkin puree

1/4 cup organic cane sugar 

3 tablespoons melted unsalted butter 

1 tsp. Vanilla extract

1 2” piece of fresh ginger, finely grated 

2 1/2 tsp. Ground cinnamon

1 1/2 tsp. Kosher salt 

Maple Butter/Garnish and Assembly: 

1/2 cup ploughgate cultured butter, room temperature 

4 tablespoons Runamok Maple Syrup (for whipped butter)

1 cup F44 Moroccan roasted pecans, roughly chopped 

Maple syrup to garnish 

Directions: 

  1. Separate yolks from eggs over a small bowl to catch egg whites. Place yolks in a large bowl. Add buttermilk, pumpkin puree, sugar, butter, ginger, and vanilla to egg yolks and mix with a rubber spatula to combine.

  2. Whisk flour, cinnamon, baking powder, baking soda, and salt in a medium bowl to combine, then gently add to buttermilk mixture and mix until dry ingredients are mostly hydrated.

  3. Briefly beat egg whites lightly with a fork, then add to batter and mix until completely incorporated. Let batter sit for 15 minutes.

  4. Make your maple butter! While the batter is resting, heat softened butter in a microwave-safe bowl in microwave 10 seconds. The butter should be extremely soft but still pale yellow in color and not melted. Add 4 Tbsp. maple syrup 1 Tbsp. at a time, whisking vigorously after each addition to fully emulsify before adding more, about 2 minutes total.

  5. Heat oil in a griddle or a non-stick pan. I used a 1/3 measuring cup, but you can really make these as big or small as you’d like. They are relatively dense, so low heat seemed to work better for me.

  6. Top with your whipped maple butter, Runamok syrup, and pecans. Enjoy!

Cook Like A Cheesemonger: Carbonnade à la Flamande

Classic Flemish beef stew, (Carbonnade à la Flamande) might be the Frankenstein of all dishes. It’s beyond delicious, however, because of the deep layering of robust flavors that develop over time while the beef slowly simmers in onions and Belgiun ale. It’s a melt in your mouth situation, a no brainer, a thank you very much, can I please have some more, can’t stop won’t stop, dish. We’re so fortunate to get such incredible beef from Peterson farms, and it’s simple and very uncomplicated to make. I added espresso and Valrhona cocoa powder to deepen all those rich and delicious flavors. It will make your heart sing, and give you all the “feel goods” you need this time of year.

Ingredients

3 pounds beef flatiron or blade steaks, cut into 1/3-inch-thick slices, about 3 inches wide. 

Salt and freshly ground pepper

4 tablespoons unsalted butter 

3 cups thickly sliced sweet onions

1/2 Cup AP or 00 Flour

3 garlic cloves, crushed and minced 

3 fresh bay leaves

1/2 tsp. espresso powder

1/2 cup fresh parsley 

2 tablespoons fresh thyme 

2 tablespoons fresh chives, for garnish

1 tablespoon Valrhona cocoa powder

3 cups any Belgian style beer

Directions: 

  1. In an enameled cast-iron pot or Dutch oven, melt 2 tablespoons of the butter. Season the beef with salt and pepper and add one-third of it to the pan. Cook over moderate heat until lightly browned, 3 minutes per side. Transfer to a bowl. Repeat with 2 more batches of meat, using the remaining 2 tablespoons of butter.

  2. Once you’ve finished browning all of the beef, add your onions, garlic and thyme. Caramelize the onions for 30 minutes until deliciously golden.

  3. Add your seared beef, bay leaves, thyme, espresso powder, cocoa, and beer to the pot! Now it’s a waiting game :)

  4. Cook on low, for 2 hours or until fork tender!

  5. Serve over polenta, egg noodles, or potatoes.

Cook Like A Cheesemonger: Ribeye Cheese Steaks

Sometimes the heart wants, what the heart wants, and it just so happened that I had a massive craving for a cheese steak this week. The universe was completely in my favor, because I have access to some of the best ribeye in the Twin Cities and a vast selection of phenomenal cheese. There was just no way I wasn’t going to make this come to fruition for myself. 

I’d like to be clear, this isn’t a “Philly Cheese Steak.” I’m not going to pretend I’m using an Amoroso roll, or that I work at Pat’s or Geno’s, but that doesn’t mean I’m not completely inspired by this icon of a sandwich. 

Ribeye is the traditional cut of choice, and normally (depending who you ask) it’s topped with caramelized onions and provolone (also cheeze whiz is a contender). 

I did my own slight twist on this American classic.  I used Peterson Farms ribeye, thinly sliced Ogleshield, and grated fontina that I made into a traditional cheese sauce.

Ogleshield, and a English-style raclette, is perfect for this sandwich because of its melting qualities and delicious richness. Add yourself a side of our house made tots, and we’re talking game over, never look back, that’s it, just go home, bye. It’s perfect for game day, an easy week night meal, or you could just follow in my footsteps and cave into your cravings just because you can. You don’t have much to lose. 

Ingredients:

(Serves 2) 

10-12 oz thinly sliced Peterson Farms ribeye steak 

1/2 medium sweet onion, sliced

1/2 green bell pepper, sliced 

1/2 red bell pepper, sliced 

2 hoagie rolls (or baguette, toasted)

1/2 lb Fontina cheese, grated 

.25 lb Ogleshield

1 cup milk 

2 tablespoons flour

2 tablespoons butter 

1/2 tbsp kosher salt 

1/2 tbsp black pepper 

3-4 tablespoons of EVOO 

Directions:

  1. Cook your peppers and onions in a sauté pan over medium heat with a tablespoon of olive oil, salt and pepper to taste. Cook until caramelized, and set aside.

  2. In order to get your steak cut as thinly as possible, it’s helpful if you put it on a sheet tray in the freezer for 15-20 minutes before you slice it.

  3. While your steak is chillin’ out, make your cheese sauce in a small saucepan. Over medium high heat, melt your butter. Whisk in the flour and slowly whisk in the milk. Add in the cheese, and whisk until melted. Set aside.

  4. Take your thinly sliced steak and season with salt and pepper. Heat a tablespoon of evoo in a large griddle or pan over medium high heat. Spread your steak out in an even layer, allowing as much surface area as possible. It should only take a minute or two to cook

  5. Time to assemble your cheesesteak! Divide your steak in your pan into two even portions. Top your individual portions with your pepper and onion mixture, and cover each with slices of Ogleshield. Let melt, and using a large spatula, put each into your roll of choice. They should be packed full of goodness! Slather that thing in your homemade cheese sauce.

Cook Like A Cheesemonger: Duck Breast

Duck, duck, grey duck? (Not in this kitchen.) Duck is my favorite protein of all time. I’ve been fortunate—spoiled, really—to have worked in fantastic restaurants where I had access to beautiful birds. Duck is uniquely rich and complex—there's just nothing quite like it. Cooking duck at home is always a daunting prospect, we hear this from customers all the time. Achieving that perfect crispy-yet-rare balance is easier than you think.

Lucky for you and me, our Culinary Director, Scott, is here to assist this week. He's spent decades working in some of the country's finest kitchens, where he's prepared more duck breast than he probably cares to remember. He took some time out of his busy schedule this afternoon to school me on cooking my favorite protein. Merci, Chef! (He will 100% hate this shout out, but he deserves it.)

This recipe began, like most, with inspiration from a single ingredient. Earlier this week, the Kamā line of Jordanian spices arrived in the shop, and my eyes shot out of my head Looney Tunes-style. The unassuming jars hold some of the loveliest spices I've had the pleasure to taste, all sourced from independent Jordanian farmers. This recipe features the za'atar and the tahiniyeh, both excellent additions to any pantry.

Ingredients (one serving):

1 whole duck breast, scored, patted very dry and seasoned with salt and pepper. 

1/2 cup full fat Greek yogurt 

0.5 lb slender carrots (or thick carrots, halved lengthwise), peeled
2 tablespoons extra-virgin olive oil
½ teaspoon fine sea salt and pepper
1/2 teaspoon ground Za’atar seasoning

For the Tahini Glaze: 

⅓ cup extra-virgin olive oil
¼ cup tahiniyeh (or another tahini)
3 to 4 tablespoons fresh lemon juice, to taste
3 tablespoons maple syrup
¼teaspoon fine sea salt, plus more to taste

Directions for the Duck:

  1. Preheat oven to 375. Place duck skin side down in a cold pan. Let skin begin to render and brown over medium-low heat, 5-8 minutes. Once nice and crisped, flip the breast over and move pan to the oven for another 6 minutes for medium rare. Let duck rest while you make the carrots. When ready, flip the duck skin side down, and slice. Salt as desired.

Directions for carrots: 

  1. Increase the oven to 425 degrees. Place sliced carrots (quarter and halved) on a large rimmed baking sheet and toss with the oil, salt, and pepper. Roast carrots for 15 minutes, then turn them and continue roasting until they are golden at the edges and tender.

2.  While the carrots are roasting, make the glaze: In a medium bowl, whisk together the oil, tahini, 3 tablespoons lemon juice, maple syrup, za’atar, salt and 1 tablespoon water until smooth. Whisk in 1 to 2 more tablespoons water until you have a thick but pourable sauce. Taste and add more salt or lemon juice, or both, if you like. 


  1. Once the carrots have finished roasting, gently toss in the tahini sauce. Garnish with a heavy hand of za’atar seasoning. Plate as you like next to the duck and a smear of yogurt. and enjoy!

Order Online